Hello Friends!
The snow is all gone, there are puddles everywhere and the sun is shining... finally Spring has arrived here 🙌 It feels almost as warm as today's card looks!
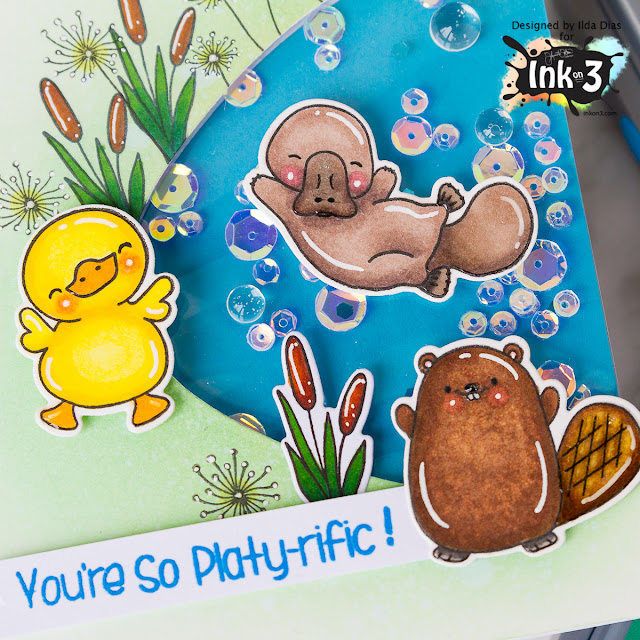
Today I have another card to share with you featuring the Playtirific Pondies Set from Ink On 3.
These little critters are so cute I had to use them again on another card. This time I wanted to create a shaker card.
For this card I had planned on creating a process video, but sadly lost some of the footage. So I will explain the process to you below. For now I have included a very short clip here so you can see it up close and in detail!
The first thing I did was stamp out the critters using Blackout Ink (my new favorite). I then colored them in using Spectrum Noir markers and die cut them out using their coordinating dies. Next, I moved on to the front panel.
To create the pond shaker area, first I used the second largest balloon die from Simon Says Stamp to die cut the pond shape on the right edge of the panel. I then lined up the die cut panel onto the card base to use as a guide and die cut the base. The balloon end will cleverly be hidden behind the duck so you would never know it was a balloon die you used to cut out the pond. I then used distress oxide inks to blend out the area along the pond. Once that was done blending, I stamped out the pond plants along the edge of the water and colored them in.
To create the shaker pocket, I used a clear cello bag (the kind you use to store the finished cards in) trimmed it to size, and adhered it with the finished bottom edge of the bag along the open edge of the card base. I then filled the pocket with sequins and glued the opening of the bag shut. Next, used foam tape along the edge of the pond to create a rim for the top panel to adhere to and to keep the sequins in place. There still was some areas that the sequins snuck into under the panel, so if you want to avoid that I would trim the bag all the way around the pond and use some double sided tape to close it together.
Once the top panel was adhered to the card base I added the critters in place with some foam tape. For the sentiment tag, I stamped the words out with Salty Ocean distress oxide ink and heat set it with clear embossing powder. The last thing I did was add some blue cardstock to the inside of the card and adhered it under the front panel. This did not only add color to the pond but it also hid the balloon end from being seen on the inside of the card.
Here is a closer look at this cuties 😍
Make sure to check out the links below for supplies I used in making this card. For more inspiration with this set check out the Ink On 3 blog.
Have a Platirific Week and hope this card inspired you today 😀
Even if it is to go outside and enjoy the Spring weather!
Thanks for stopping by!
Happy Crafting :)
SUPPLIES
To make supplies easy to find, I have linked them below. If something I used is no longer available I will link to a similar product.
Affiliate links may be used depending on the product. Your purchases help keep my blog running, so thanks in advance for the support!
 Platy-rific Pondies Shop at: SSS | IO3 |
 Platy-rific Pondies Coordinating dies Shop at: SSS | IO3 |
 Blackout Hybrid Detail Ink Shop at: SSS | IO3 |
 Strathmore 20 Sheet Smooth Bristol Pad, 9 by 12" Shop at: SSS | AMZ |
 Tonic Studios Tim Holtz Stamp Platform Shop at: SSS | AMZ |
 SSS BALLOONS Craft Dies Shop at: SSS |
 Sizzix Big Shot Shop at: SSS | AMZ |
 Sizzix Big Shot Magnetic Platform Shop at: AMZ |
 STANDARD CUTTING PADS Shop at: SSS | AMZ |
 Simon Says Stamp 2.5 Inch ACRYLIC BLOCK Shop at: SSS |
 Ranger Mini Ink Blending Tool 1" Shop at: SSS | AMZ |
 Oxide Ink Pad FOREST MOSS Shop at: SSS |
 Oxide Ink Pad CRACKED PISTACHIO Shop at: SSS |
 Oxide Ink Pad LUCKY CLOVER Shop at: SSS |
 Oxide Ink Pad SALTY OCEAN Shop at: SSS |
 Tim Holtz DISTRESS SPRAYER Ranger Shop at: SSS |
 Studio Katia CRYSTAL CLEAR Fusion Sequins Shop at: SSS |
 The Official Anti-Anxiety 360 Spinner Shop at: SSS |
 Gelly Roll Gel Pen Set, Fine, Black Shop at: AMZ |
 Sakura 6 WHITE Gelly Roll Classic Medium Point Pens Set Shop at: SSS | AMZ |
 Quilled Creations PRECISION TIP Applicator Bottle Shop at: SSS | AMZ |
 Ranger Inkssentials Glossy Accents, 2-Ounce Shop at: SSS | AMZ |
 Inkadinkado Embossing Magic Shop at: SSS | AMZ |
 EMBOSSING POWDER-ICICLE Shop at: SSS | AMZ |
 Black & Decker HG1300 Dual Temperature Heat Gun Shop at: AMZ |
 3M Scotch PINK ATG ADVANCED TAPE GLIDER Shop at: SSS | AMZ |
 3M Scotch 1/2-Inch Double-Sided Foam Tape Shop at: SSS | AMZ |
 Recollections White Heavyweight Cardstock 110bs Shop at: AMZ |
 Elmers X-Acto 12” Base Guillotine Shop at: AMZ |
 Martha Stewart Crafts Scoring Board 12x12 Shop at: AMZ |


No comments:
Post a Comment
Thanks so much for taking the time and leaving me a comment! I always love hearing from you and I appreciate you stopping by! Hugs, Ilda