Showing posts with label fondant. Show all posts

Monday, January 18, 2016

Karen's Quilted Wedding Cake and Card


Hi Everyone :)

Sorry it has been a while since my last post... I was starting to feel a bit of blogger's guilt! I have been doing quite a bit of crafting lately but haven't had much time to post any of it. Hopefully I will be able to soon ;)

So today I want to share with you all my first EVER wedding cake! My friend Karen, (the bride who I've worked with for many years) had asked me for a simple quilted ivory cake with a hot pink rose. Well, what the bride wants is what the bride must get! I must admit I was a bit nervous with this one as there is very little room for error when working with white cakes, plus it's a WEDDING cake! Eeek, talk about pressure! That's why I could never do this full time... too stressful, lol! But in the end I was very pleased with how it turned out!


For those interested in what is actually inside the cake 
Top layers- Vanilla & Chocolate flavoured - baked in two 6 inch round pans.
Bottom layer - Vanilla & Chocolate flavoured - baked in a 10 inch round pans.
Entire cake was frosted with vanilla butter cream icing and covered with fondant.
Topper from Precious Moments.


To go along with the cake I also made Karen and Alan a simple card.
The quilted embossing folder I used comes from We r Memory Keepers.
Stamp from Studio G
Orchid Die from Spellbinders


Congratulations Karen and Alan, I wish you both the very best in your future lives together.
Hope you enjoyed and devoured the cake!

Thanks for stopping by Everyone!
Hope this Simple Wedding Cake and Card has inspired you as well :)


Happy Crafting!


Saturday, November 22, 2014

Woodland Baby Shower Cake

Today I am so super excited to share with you all my Woodland Baby Shower Cake! Yay!!! So very happy with how it turned out! How cute is that!?!

This cake was very different then cakes I have made in the past. This time I covered the cake with modeling chocolate, and the smell of this cake was unbelievable!!! Wish there was a scratch and sniff button you could push to smell it, lol! Honestly, I wish I had tried using modelling chocolate long ago! I know I'll be using it a lot more in the future too ;)


Here are some more pics of my little woodland critters!
How adorable are they!?! I made them ahead of time out of fondant so that they would have plenty of time to harden.


This cake was a 2 layer 9 inch round cake. Top part vanilla, bottom is chocolate flavored. Iced in buttercream and covered with ganache. Finished off with modelling chocolate! Can you say yummy?

Congrats to soon to be "Vovo" (Grandma) Connie who requested I make her this Woodland Baby Shower Cake for her soon to be Grandson! Wishing the family all the best :)

Thanks for stopping by!
Happy Crafting  :)


Thursday, November 7, 2013

Celestial Twin Baby Shower Cake and Decor | DIY Cakes and Party Decor | SVGCuts Files

This weekend I had the privilege of making the sweetest cake for my friend Emilia's baby sister Gabriella, who is expecting TWINS! If you are planning a baby shower hopefully this post might help give you some more ideas :)

The cake turned out super CUTE!  

Celestial Twin Baby Shower Cake and Decor | DIY Cakes and Party Decor | SVGCuts Files

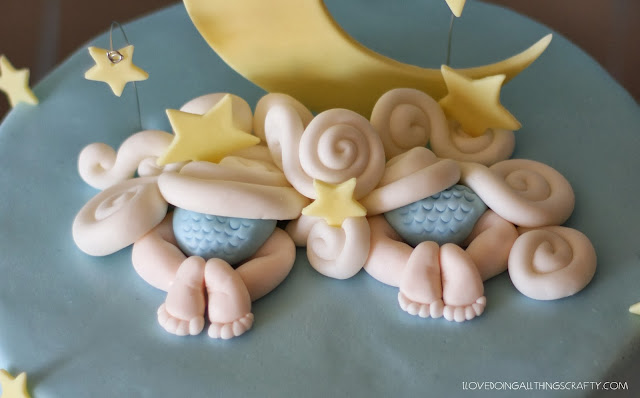
The color theme for the Shower was blue and yellow. So the first thought that came to my mind was the sky and the moon, then came the set of twin baby feet hiding under the clouds. 

Aren't those little feet adorable? And what about those ruffled diapers...  double the diapers, double the fun!

Celestial Twin Baby Shower Cake and Decor | DIY Cakes and Party Decor | SVGCuts Files

By far my favorite part of the cake was making the swirly clouds! 
So easy and fun to make :) 

Celestial Twin Baby Shower Cake and Decor | DIY Cakes and Party Decor | SVGCuts Files

Here are some cake details...

Bottom baked in an 11 inch round form - chocolate cake
Top baked in an 11 inch round form - white cake
Frosted with vanilla buttercream icing
Covered in fondant

Since I had a hand in helping my friend Emilia set up for the party, here are a few more pics I thought I would share.  I can't and won't take credit for all the work because this was definitely a team effort, my part was the cake table and its decorations. The rest was done by Emilia and the family of the mother to be. They took care of the centerpiece diaper cakes and table decor, Thank you gifts, games, prizes, desserts, and food... great job ladies!

Celestial Twin Baby Shower Cake and Decor | DIY Cakes and Party Decor | SVGCuts Files

Everything was amazing, thanks for allowing me to be a part of this day!

For those interested, here are some links to the papercrafts I created using the Silhouette Cameo for the party.

Gift Tag from BOXES AND BAGS
Moon from FREE DESIGNS
Banner from TOIL AND TROUBLE KIT
3D Baby Shoes and Safety Pin on Banner from BUNDLE OF JOY SVG KIT
Pedestal from POPULAR STREET TULIPS SVG KIT

Congratulations Gabriella and Chris! Can't wait to meet those little boys of yours... should be any day now... Eeeeek!

I hope you enjoyed and maybe picked up a few ideas for your next party.

Thanks for stopping by!
Happy Crafting and Party Planning :)

Monday, November 4, 2013

Darth Vader Cake | DIY Cakes

Any Star Wars fans out there? If so, this one is for you! 

Today I want to share with you a Darth Vader cake I made for a friend of mines'  husband.

Darth Vader Cake | DIY Cakes

Happy Birthday John... May the 40th be with you! 
I wonder how many times he heard that this weekend?LOL! 

Here is the side view of Darth's head

Darth Vader Cake | DIY Cakes

Cake details...

I used 1, 10-inch cake pan to bake the bottom layer
The top layer was baked in a Pyrex bowl
Measured 7 inches tall
Flavor chocolate
 Frosted with a vanilla buttercream icing
Covered with black fondant

I hope you liked my Darth Vader Cake if you are planning a Star Wars Party make sure you check out this and this link for more ideas.

Stay tuned for a baby shower cake I also made for this weekend.

Thanks so much for stopping by, 
Happy Cake Decorating :)

Sunday, October 13, 2013

Beary Sweet Train Baptism Cake | DIY Cakes


Happy Thanksgiving Weekend Everyone! Well at least to all my Canadian friends :) 
Today I have a Baptism Cake to share with you all! I was asked if I could make a cake for a Baptism this weekend. Funny how people think I'm a baker or something now, LOL! Of course as usual I said yes, hopefully, they will be happy with the results. I was sent a photo of some inspiration... Two bears, cross, blanket, and especially the train were musts. The photo I found came from Kimberly, an amazingly talented cake artist! I do have to give her credit, thank you, Kimberly, from Kimberly Dawn Cakes for the inspiration, love your work! 

Look at that "Bear" Bum! Isn't it a CUTIE! You could almost bite it... well technically you could, haha!

Beary Sweet Train Baptism Cake | DIY Cakes

Well what do you think? Two bears, cross, blanket, train, and I even threw in a rosary!
I really love how it came together :)


Beary Sweet Train Baptism Cake | DIY Cakes

Bear hanging out, waiting for the party to start!

Beary Sweet Train Baptism Cake | DIY Cakes

Here is bear #2, isn't he darling?

 The entire cake is edible except for the supports and the ribbon.

Beary Sweet Train Baptism Cake | DIY Cakes

Top layer - baked in two 6 inch round pans and is Red Velvet
Bottom layer - baked in a 10 inch round pan and is Marble
The entire cake was frosted with vanilla buttercream icing and covered with fondant.
The cake stands 14 inches tall to the top of the cross.

Beary Sweet Train Baptism Cake | DIY Cakes

Thanks so much for stopping by, hope you all liked this super cute Baptism cake. May God Bless Nicholas and his family on his special day!

Happy Crafting :)

Monday, October 7, 2013

Despicable Me 2 Minion Cake | DIY Cakes

I am super excited to share with you all the Despicable Me 2 Minion Cake I made for a double birthday party this past weekend! My Goddaughter Stella chose the theme for the party. My sister also turned 20 this week so the families got together for their joint party! So of course, I brought the cake ;)

Here is your first look of many pics to follow! Doesn't he look excited?!

Despicable Me 2 Minion Cake | DIY Cakes

My Goddaughter Stella turned 4, I thought it would be cute to have the Yellow Minion hold 4 candles and have the top portion of the cake represent her. While the bottom Minion, was made for my sister Catarina who turned 20 this week!

Really happy about how it all came together!

Despicable Me 2 Minion Cake | DIY Cakes

Top View

Despicable Me 2 Minion Cake | DIY Cakes

Close Up

Despicable Me 2 Minion Cake | DIY Cakes

 The Top Yellow Minion Cake - Chocolate cake frosted with chocolate buttercream icing
baked in a 6 inch round pan (3 layers) - measured around 9 inches tall

Bottom Purple Minion Cake - Vanilla Cake - Vanilla buttercream icing
baked in an 11 inch round pan (2 layers) - measured 4 inches tall

All covered with Fondant

Despicable Me 2 Minion Cake | DIY Cakes

Thanks so much for stopping by! I hope you liked my take on Despicable Me 2's Minion Cake! I had a lot of fun making it and a better time eating it!!! Yummo!

Happy Crafting! :)

Friday, August 9, 2013

Rock Star Birthday Party | DIY Party

This past weekend our family celebrated my daughter's 7th Birthday.  Hard to believe my little girl is 7 already! For her party, she wanted to go with a rock star theme. She's really into karaoke these days and likes to act like a rock star... DIVA and all! I can hardly wait for those teenage years! If you've been following my blog you'll know she already had an early birthday party about a month ago with all her little girlfriends from school. Click HERE for her Paint themed Party!

Here is our little DIVA!


Other than the ceiling decor, I didn't do too much to decorate for the party. I had seen this done somewhere on Pinterest and thought about doing something similar for her party. Such a simple and inexpensive decoration too.

The only things I did purchase from Party City that were Rock Star themed were the balloons, 1 table cloth, hanging coils, and loot bags.

Here's what I used to make the ceiling decoration: 
  • 2 black plastic tablecloths 
  • 1 blue plastic tablecloth
  • 1 pink plastic tablecloth
  • 12 pink tissue paper sheets for the tissue pompom. Click HERE for directions.
(All supplies listed above were bought at a Dollar Store (for less than $5) why spend more when it goes right into the garbage when you are done!)
    All I did was cut each table cloth in half lengthwise. Then I chose my center point on the ceiling. I then took one end of the plastic pieces of table cloth gathered it together and with a thumbtack pierced it into the ceiling. Then I stretched out the same piece and secured each end of that piece with another tack. (For extra strength and to prevent it from ripping, I rolled the end of the cloth first and then pierce through two layers. This also hid the tack from view). Repeat the process with as many pieces as you like!

    Don't worry too much about the holes left behind on the ceiling, they are barely noticeable. Especially if you have a textured ceiling like I do.


    I also created this table back drop by covering 2 foam board pieces with pink wrapping paper and then used another black table to create the curtains of a stage. The stars were created with my Silhouette Cameo.


    Finally, here is the cake I made for my little Rock Star! The bottom layer was a chocolate flavored 10 inch cake and the top a vanilla flavored 6 inch cake. All covered with vanilla butter cream and finished with fondant.  I used rice crispy treats to create the guitar shape and covered it with fondant, and the guitar strings.... SPAGHETTI!  Yup, just painted them silver. I was mostly excited about the bottom quilted layer. For my first try doing this technique it turned out pretty awesome! 


    Hope you like my take on the Rock Star themed Party! I know my little girl did :)
    Thanks so much for stopping by.

    Happy Party Planning :)

    Monday, July 8, 2013

    Paint Palette Cake | DIY Cake


    Yesterday we celebrated my daughter's 7th birthday party will all her little school friends. Her actual birthday is still a few weeks away but because it ends up being in the middle of the summer, many of her friends are going on vacation. Since my daughter Maia loves art, we decided to book her party at an art studio. To match the theme I created a paint palette cake! I was really happy with how it turned out and she loved it!


    The coolest part about the cake was the inside! Here is how you can make your own...


    You will need 2 white cake mix boxes. Follow the directions on the packaging. Once your batter is ready, divide it into as many colors as you want to make by pouring it into smaller bowls. (I made six) Next add gel food color to each bowl, a little at a time until you've reached your desired shade.


    Pour your cake batter into your tins, alternating colors as you like (I used two 10 inch round cake pans.) Bake as per box instructions. Cool and ice your cake, decorate as desired! 

    Here is a photo of the inside of the cake, isn't it so cool!


    Since I like to use fondant to decorate my cakes, I freeze my cake until I am ready to decorate it. This way they are much easier to ice.  


    Thanks for visiting today... I hope I have inspired you to add a little color to your next cake! It sure was fun to make and even better to eat! It will surely be a hit at your party :) Stay tuned for more details on the Paint Party!

    Happy Crafting or in this case Baking :)

    Monday, June 10, 2013

    Monster High Cake for Aleina

    It has been a few weeks since my last post... crazy busy on this end. The fun never seems to stop... always something on the go! 

    Since my last post, I've been working on my projects for the upcoming CEM Magazine issue, done a little traveling, worked at the hospital, done lots of yard work, housework, parented, wifed and made this awesome cake for my God Daughter Aleina that I'm sharing with you today!

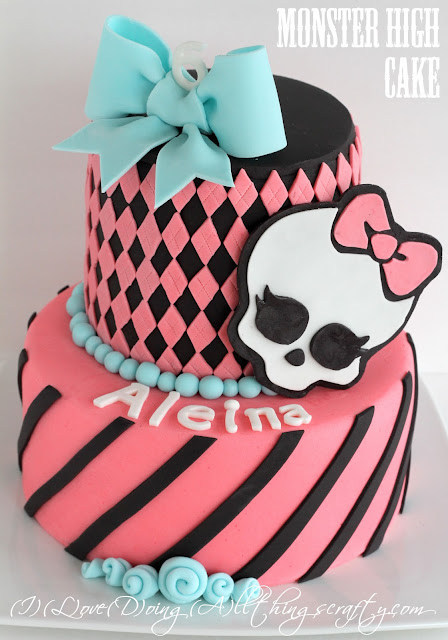
    Isn't it pretty? Even if it is a little creepy and "gothy", I LOVE how it turned out :) 

    Monster High Cake for Aleina

     This was a very large cake, standing at around 12 inches tall. The lower tier of the cake was 10 inches wide and was vanilla flavored. The top layer was a 6-inch chocolate cake. The entire cake was covered in a vanilla buttercream icing, covered and detailed with fondant. For those of you that are curious, this cake took approximately 7-8 hours to complete. Might make you understand and appreciate why these kinds of cakes have a higher price tag ;)

    Monster High Cake for Aleina

    I have to be honest I don't have any idea of what this "Monster High" is all about but that is what the Birthday girl wished for! Personally, I think if I was 6 years old, I would be freaked right out by those dolls... boy how times have changed, lol!

    Monster High Cake for Aleina

    I hope you liked my take on a Monster High cake. I know the birthday girl loved it and that was all that mattered! Happy Birthday, Aleina :) 

    Happy Crafting :)

    Monday, May 27, 2013

    Winnie the Pooh Cake

    Happy Memorial Day to all my American Friends hope you are all enjoying the holiday!

    Today, I would like to share with you a cake I made for my friend Karen's little boy. William turned 1 this past weekend and I had the honor of making his very first Birthday Cake! Yay, Will!

    What 1 year old doesn't love Winnie the Pooh?! Isn't he cute??? I love how it all came together. Winnie is all made of fondant and the center of his body is Rice Krispies treats. Totally edible if Will wanted to take a bite, lol!

    Winnie the Pooh Cake

    Here are a few more pics of the cake... close up and from different angles. 

    Winnie the Pooh Cake
    Aren't those bumblebees just the cutest little things?

    The inside of the cake had a chocolate flavored bottom layer and a yellow cake top layer, iced and with vanilla buttercream. It was finished and decorated with fondant. Measured 10 inches in diameter and approximately 4 inches high (not including the toppers). 

    Happy Birthday, Will, hope you have an amazing year! 

    Thanks for coming by, if you are planning on making a Winnie the Pooh cake hopefully I have inspired you!

    Happy Crafting :)

    Saturday, February 2, 2013

    Ombré Princess Cake | DIY Cake


    I hope everyone is enjoying the weekend! 

    This post was pre-scheduled... right now I should be enjoying the fabulous birthday party for a very special little princess named Annabella!  Today she is 5. Her mom, a very good friend of ours asked if I would make her a birthday cake... I knew exactly what I was going to make. Since she planning a princess theme, I thought an ombré cake would be perfect for the occasion. For those of you that haven't heard this term, it means having colors or tones that shade into each other. 

    Ombré Princess Cake | DIY Cake

     So what do you think? Isn't it fabulous?!? I LOVE how it turned out. SO happy, hope the birthday girl loves it as much as I do!

    Ombré Princess Cake | DIY Cake

    Very Girly! The tiara on top is the perfect keepsake for the birthday girl! 
    Happy Birthday, Annabella!

    Ombré Princess Cake | DIY Cake

    The cake is about 10 inches high and 7 inches wide. The top layers are butter pecan and the bottom layers are chocolate cake. All covered with a vanilla buttercream icing and finished with fondant.  To get the ombré look I started with six equal pieces of white fondant and kept adding more pink to each layer, then gradually introducing more and more purple. 

    Thanks for stopping by, I have a feeling this won't be my last ombré cake!

    Have a great weekend :)