Showing posts with label Busy Bees. Show all posts

Monday, April 1, 2019

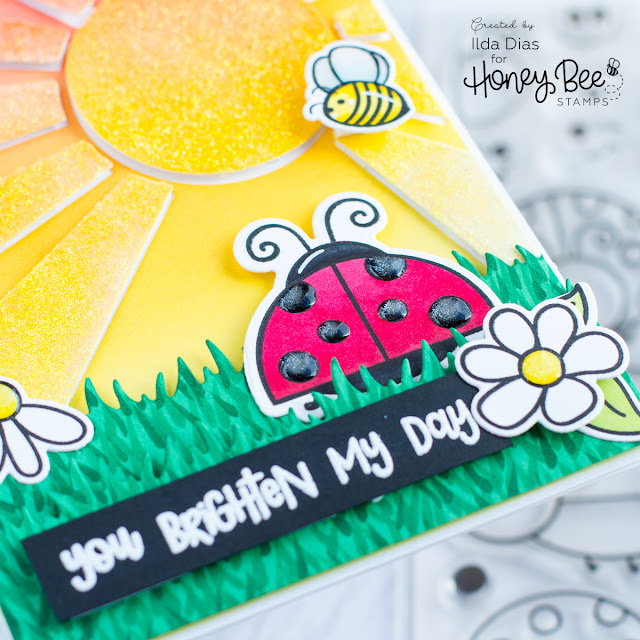
Lady, You Brighten My Day | Friendship Card | Honey Bee Stamps

Lady, You Brighten My Day Friendship Card for Honey Bee Stamps by ilovedoingallthingscrafty.com

Hello Sunshine, Hello Friends and Happy April!

Yes, Spring has finally arrived and today I have a sunrise scene card featuring the SUNBURST COVER PLATE and a few of the Honey Bee Little Critters.

Lady, You Brighten My Day Friendship Card for Honey Bee Stamps by ilovedoingallthingscrafty.com
CARD DETAILS

I began this card by blending out the background. On a piece of Bristol paper, starting from the top I blended out Barn Door, Carved Pumpkin, Mustard Seed and Squeezed Lemonade Distress Oxide inks. Once the ink was dry I die cut the pieces of the background using the SUNBURST COVER PLATE. To the sun and the sunray pieces, I added a layer of Glimmer Paste and let them dry.

Next, I die cut the grass strips from green cardstock using the GRASS BORDER DIE. To add some more texture and dimension to the grass, I added some blade strokes using a few green colors of Copic markers.

Lady, You Brighten My Day Friendship Card for Honey Bee Stamps by ilovedoingallthingscrafty.com

The little bee and flowers come from the BUSY BEES set, which has to be one of my favorite Honey Bee sets as I reach for it so often. I stamped them out using Blackout ink, colored them in with Copics and then die cut them with their coordinating HONEY CUTS.

The cute little ladybug staring up at the sunrise comes from the LITTLE LADIES set, that was also colored in with Copics and die cut with the coordinating LITTLE LADIES HONEY CUTS. To add some sparkle and shine to the ladybug I added some Liquid Pixie Dust to the dots on the body and then added some drops of glossy accents and let set it aside to dry.

Lady, You Brighten My Day Friendship Card for Honey Bee Stamps by ilovedoingallthingscrafty.com


For the greeting, I combined a few stamps from the LOVE BUG set. First, I stamped onto a piece of black cardstock using white pigment ink that I also heat set using white embossing powder and then I used the BANNER BUILDER HONEY CUTS then trimmed it to size. 

Once all the pieces of the card were finished all I did was glue them onto an A2 top folding card base. Using foam tape to add dimension and layers to the scene. 

SUPPLIES
To make supplies easy to find, I have linked them below. If something I used is no longer available I will link to a similar product.
Affiliate links may be used depending on the product. Your purchases help keep my blog running at no extra cost to you, so thanks in advance for the support!

SUNBURST COVER PLATE
Shop at:
SSS | SB | HBS
Little Ladies
Little Ladies
Shop at:
SSS | SB | HBS
Little Ladies Dies
Little Ladies Dies
Shop at:
SSS | SB | HBS
Busy Bee Stamp Set
Busy Bee Stamp Set
Shop at:
SSS | SB | HBS
Busy Bees | Honey Cuts
Shop at:
SSS | SB | HBS
BANNER BUILDER HONEY CUTS
Shop at:
SSS | SB | HBS
Grass Border Dies
Grass Border Dies
Shop at:
SSS | SB | HBS
Strathmore Bristol Pad
Shop at:
SSS | AMZ
Oxide Ink Pad BARN DOOR
Shop at:
SSS | HBS
Oxide Ink Pad CARVED PUMPKIN
Shop at:
SSS | HBS
Oxide Ink Pad MUSTARD SEED
Shop at:
SSS | HBS
Oxide Ink Pad SQUEEZED LEMONADE
Shop at:
SSS | HBS
BLENDER BRUSH Set
BLENDER BRUSH Set
Shop at:
SSS | AMZ | PF
Recollections Black Cardstock 110bs
Shop at:
AMZ
Glimmer Paste | Moonstone
Shop at:
SSS | AMZ | HBS
Neenah  80 LB SOLAR WHITE
Neenah 80 LB SOLAR WHITE
Shop at:
SSS | AMZ
Mini Misti Tool
Mini Misti Tool
Shop at:
SSS | AMZ | SB | SK
Blackout Ink
Blackout Ink
Shop at:
SSS | IO3
Inkadinkado Embossing Magic
Shop at:
SSS | AMZ
 UNICORN White Pigment Ink Pad
UNICORN White Pigment Ink Pad
Shop at:
SSS | AMZ
Arctic White Ultra Powder
Shop at:
SSS | IO3
Glossy Accents
Glossy Accents
Shop at:
SSS | AMZ | SB
WHITE Gelly Roll Pens Set
Shop at:
SSS | AMZ
Double-Sided Foam Tape
Shop at:
SSS | AMZ
STUDIO KATIA GLUE
STUDIO KATIA GLUE
Shop at:
SSS | SK


Hope this card brightened your day!  This card definitely has a lot of sparkle and shine and is sure to brighten someone's day! 

Thanks for stopping by and until next time... 
Happy Crafting 👋

Friday, February 23, 2018

Honey Bee Stamps Cheerful Love Blog Hop


Hi Crafty Friends, and welcome to my Blog!!!
Thank you for hopping on over to the last stop for today's Honey Bee Cheerful Love Blog Hop.

The Honey Bee Stamps Cheerful Love Release is now available in the store. To celebrate the new release, we are having a two day blog hop called Cheerful Love. So please hop along with us both days to be inspired! 

For my first card, I used two new sets. 


I thought it would be super cute to create and interactive scene card for Penny the Platypus' Graduation. To begin I colored Penny and her accessories with Prismacolor pencils. Once the coloring and cutting was done, I began to build the shaker. To create the shaker window I used the two largest Double Stitched Frames Dies. Next, I wanted to create the illusion of  the moving graduation cap, so I taped a very fine clear thread to the back of the cap then glued the ends to the sides of the rectangle frame. I then sandwiched the thread between the frame and the acetate. Before attaching the thread, I made sure I left enough slack for the up and down movement. In this case I wanted it to appear like it was sitting on her head and I also wanted to make sure I left it long enough so that when the hat moved up it would cover up the HATS OFF sentiment. The shaker mix consists of Clear Iridescent Sequins and Unicorn Rhinestones.

As you can see here in the image below the HAT is OFF! and the sentiment is covered up.
I had fun with this design.


To the inside of the card I mixed a few of the Congrats Grad sentiments to stamp my message.


Watch a short clip of Penny's hat here in action!


For my next card,  I wanted to continue playing with my Prismacolor pencils. I think I'm hooked on coloring with pencils now... btw, this was the second card I had ever made using Prismacolors and the first time was the previous Graduation card! I can't believe how fun it is to color with them!

Anyways, onto the card. 
For my second card,  I used the new Feelin' Foxy and the Foxy Sentiments Stamp sets.
I also used the Country Blooms and the tree stencil from the Outdoor Scenes Builder Set.

I LOVE how this scene turned out. 
For this card I chose to make it for a lady, so in order to make the fox look more feminine I added a few lashes and gave her some blushed cheeks.


Of course I had complete the foxy themed birthday message, so to coordinate it I stamped "my Foxy Friend" on the inside. I just love how you can build your own messages with the Honey Bee sentiment stamps!


I have to say this Foxy Friend Birthday card was my favorite card to create, so I chose it to film today's process video. I wish I had time to do a video for all three cards but unfortunately I didn't have the time. If you'd like to watch a newbie like me color and create this card, check out my video.

Click→HERE to watch in HD.

And finally, here is my third and final card.

 A clean and simple, quick shaker card using the new Ridiculously Happy stamp set. Again here I used a couple of the Double Stitched Frames Dies to create the window/top panel. Then I stamped my sentiment using Peacock Feathers Distress Oxide Ink and heat set it with a clear embossing powder. The little bees I used come from the Busy Bees Stamp Set. I stamped them onto the card base and I used Spectrum Noir markers to color them in. Before attaching the window/top panel, I filled the little window area with some Little Love heart Sequins.


To finish this card off, I added this fun message on the inside.
I think this would make a great card for a friend or loved one!


I hope you were inspired by my card creations today using these amazing new Honey Bee sets.
I'd love to know which card you liked the most, let me know in the comments below.

Be sure to visit each blog & leave a comment to be entered to win!!! We will be giving away two $50 gift cards to the Honey Bee Stamps store, one from each day. The winners will be posted on our blog Tuesday, February 27th.

Honey Bee Stamps
Emily Midgett
Kelley Kohout
Jo Ann Danchik
Carly Minner
Carrie Bryant
Carol Hintermeier
Ilda Dias ⟸ YAY, YOU ARE HERE!

Don't forget to stop by the Honey Bee Stamp Blog tomorrow to start Day 2 of the Hop, and BEE inspired by more from our amazing Design Team!

Thanks for stopping by!
Happy Crafting  :)
Linking to:

SHOP Cheerful Release NOW
To make supplies easy to find, I have linked them below. If something I used is no longer available I will link to a similar product.
Affiliate links may be used depending on the product. Your purchases help keep my blog running, so thanks in advance for the support!
Feelin' Foxy Stamp Set
Shop at:
SSS | HBS
Foxy Sentiments Stamp Set
Shop at:
SSS | HBS
Feelin' Foxy | Honey Cuts
Shop at:
SSS | HBS
Foxy Sentiments | Honey Cuts
Shop at:
SSS | HBS
Penny The Platypus Stamp Set
Shop at:
SSS | HBS
Penny The Platypus | Honey Cuts
Shop at:
SSS | HBS
Congrats Grad Stamp Set
Shop at:
SSS | HBS
Congratulations | Honey Cuts
Shop at:
SSS | HBS
Cheerful Sentiments Stamp Set
Shop at:
SSS | HBS
Ridiculously Happy Stamp Set
Shop at:
SSS | HBS
Birthday Cheer | Honey Cuts
Shop at:
SSS | HBS
Just Because | Honey Cuts
Shop at:
SSS | HBS