Friday, June 22, 2012

3D Paper School House Treat Boxes for Teachers | SVGCuts

Yeaaaaah! School is almost done!!! My kids are so excited for the summer holidays to begin... they have started the countdown a while ago, LOL! 

My son is even more excited he gets to miss the last week of school... even though they are the fun school days, he really doesn't care! He leaves tonight with my In-laws for Portugal! He is so excited, I'm sure going to miss my little man :'( Well join them there in August!

So because today was his last day of school I wanted him to give his teacher a little gift to thank her for all her help this year... (I think teachers have the hardest job! They deserve so much more!!!) Of course I made the same gift for my daughter's teacher, but she won't receive it until next week! Hopefully, Mrs. Stiksma doesn't show Mrs. Esser, LOL!

3D Paper School House Treat Boxes for Teachers | SVGCuts by ilovedoingallthingscrafty.com
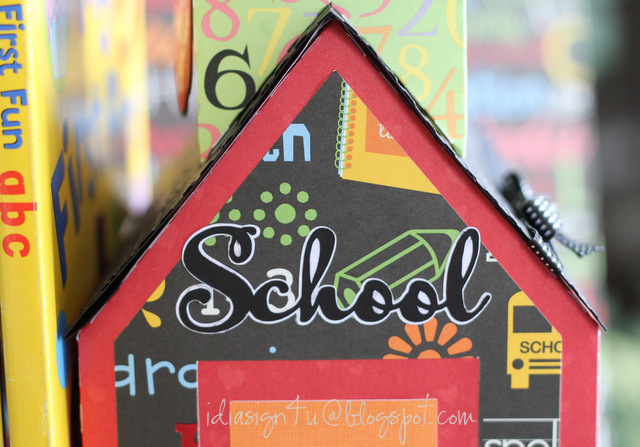
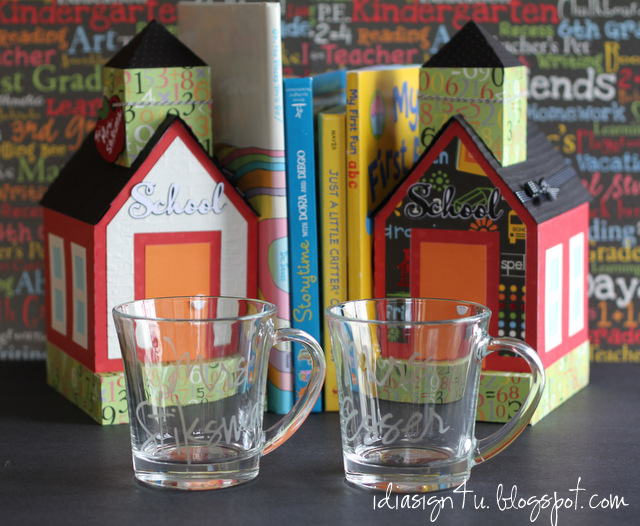
 Aren't the School Houses adorable!!! The cutest part is that they are totally functional, flip open the roof and they are gift boxes! Fill them up with goodies and they could also be used as bookends :)  What teacher would love them? 

3D Paper School House Treat Boxes for Teachers | SVGCuts by ilovedoingallthingscrafty.com

The files I used come from SVG Cuts SCHOOL DAYS SVG KITLOVE their files!!! (I did have to enlarge the files to accommodate the size of my gifts) The cardstock comes from DCWV, the Grade School Stack, all cut with the Cameo.


3D Paper School House Treat Boxes for Teachers | SVGCuts by ilovedoingallthingscrafty.com

Used the apple file to make a tag!

3D Paper School House Treat Boxes for Teachers | SVGCuts by ilovedoingallthingscrafty.com


3D Paper School House Treat Boxes for Teachers | SVGCuts by ilovedoingallthingscrafty.com

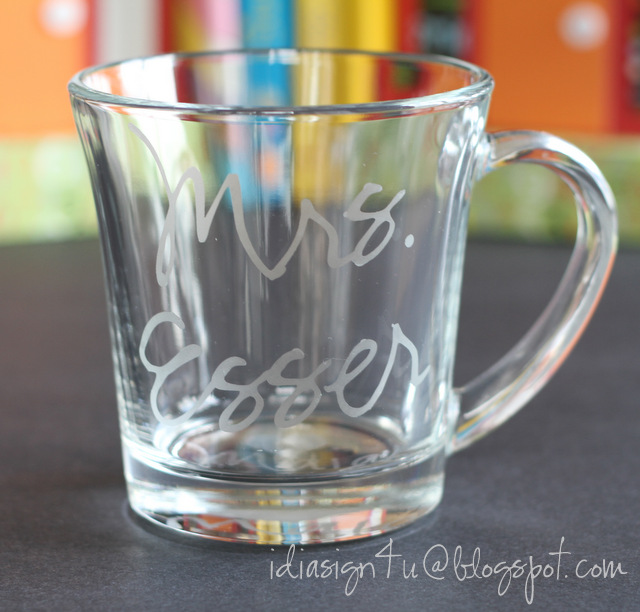
And here is what goes inside the gift box! Love personalized gifts... just makes it that more special! Thank you, Mrs. Esser! Maia is sure going to miss you!!!

3D Paper School House Treat Boxes for Teachers | SVGCuts by ilovedoingallthingscrafty.com

Thank you Mrs. Stiksma! Tomas adores you and will miss you very much!

3D Paper School House Treat Boxes for Teachers | SVGCuts by ilovedoingallthingscrafty.com

Etched the bottom of the glass with the kids' names :)

3D Paper School House Treat Boxes for Teachers | SVGCuts by ilovedoingallthingscrafty.com

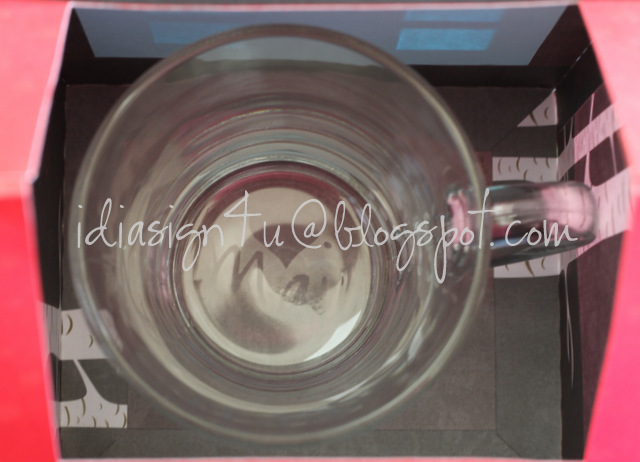
A perfect fit inside the School House gift box! Add tissue paper and perhaps a coffee gift card and DONE!

3D Paper School House Treat Boxes for Teachers | SVGCuts by ilovedoingallthingscrafty.com

I'll post some pics of how I etched the glass mugs in my next post!

Thanks for stopping by, 

Friday, June 15, 2012

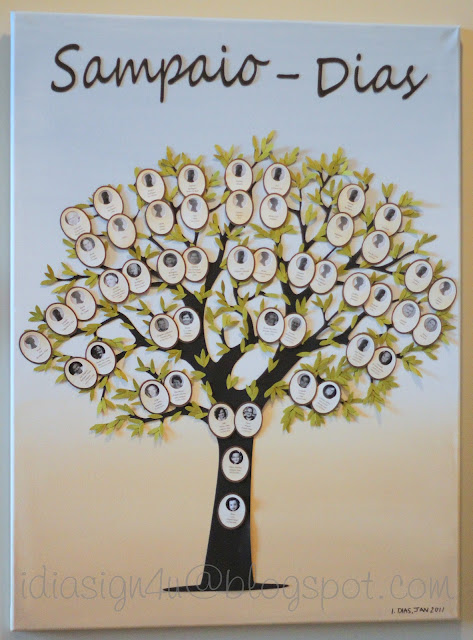
Our Family Tree | DIY Mixed Media Canvas Art Piece

For a while now, well I guess ever since I started the blog I've been wanting to share one of the first crafts I made using my Cricut! It hangs as a piece of art in our hallway, it is such a unique piece. I always love to stop and stare at it!

For those that don't know I am of Portuguese descent. My parents immigrated to Canada from Portugal when I was 2 in 1978. My husband's family is also Portuguese, so for my children, I thought it would be interesting to create this so that they could see their roots.

I guess this project was many years in the making,  every time we had gone back to visit our grandparents I would gather more data for the family tree.  So here is how it turned out!  (I did not include any siblings, because as you can imagine there would not be enough room on the canvas!) 

WARNING... this is a LONG WINDED POST! LOL!!!

Our Family Tree | DIY Mixed Media Canvas Art Piece by ilovedoingallthingscrafty.com

Since I made this piece a while ago and had no blog at the time, I didn't take pictures of the steps it took to make this. I will try my best to explain what I did though. 

The first thing I did was paint my canvas, this one measures 32X24. I really wanted a washed out antique look, so I sprayed water all over the canvas and applied my acrylic paints to it. Light blue for the sky and a light brown for the ground. Once I had both the colors on the canvas I blended the two colors where they met in the middle to create the horizon.

Next came the fun stuff! I found the image of this tree on Google (sorry don't remember exactly where). I then traced the image with the SCAL program. Then I enlarged it to the size I wanted. Since the canvas was way larger than the cutting mat, the tree was made by cutting 4 pieces and overlapping them in some areas. I adhered all the pieces of the tree to the canvas using hot glue. Once my tree was all assembled and glued down I cut out the leaves. The leaves I created from the basic shapes library. When I glued down my leaves I strategically placed them to cover up the paper joints of the tree. 

Our Family Tree | DIY Mixed Media Canvas Art Piece by ilovedoingallthingscrafty.com

The next part was the hardest... Since both sides of our families have the name "Oliveira", I wanted to make the tree look like an olive tree since Oliveira means olive in English. So I thought it would look cute if the frame of the picture looked like an olive, well kinda, sort of maybe not really!! ;) 

To do this I cut out two ovals, one larger than the other. In SCAL I  created a template for the top part of the frame which turned out to be 5 olives/line and 4 rows of them for a total of 20 frames per sheet. Then in using Microsoft Word, I did my best to place the names at the bottom of the frames. (Took a few tries to line it all up... I would place the template on top of the sheet I printed to make sure it all lined up.) Once everything was in line I cut out the paper I had just printed on... 

***This would of all just been so much easier if the Silhouette Cameo had been invented...  I guess I was just ahead of my time, LOL! ;)***

Our Family Tree | DIY Mixed Media Canvas Art Piece by ilovedoingallthingscrafty.com
Once all the frames were cut out, I glued the top of the olive to the bottom brown oval. I only applied glue to the bottom part of the olive frame. 

Our Family Tree | DIY Mixed Media Canvas Art Piece by ilovedoingallthingscrafty.com

This left the top part accessible to change pictures... especially of the kids as they get older, I can stay this age for a while, cause I never age! Muhahaaa!!!

Our Family Tree | DIY Mixed Media Canvas Art Piece by ilovedoingallthingscrafty.com

For those family members that I had no picture for I just used a silhouette. The gentleman with thick sideburns would be my Great, Great, Grand Father, and my Great, Great, Grand Mother just below him. So cool that I had found a picture of them! 

Hope the instructions weren't too confusing for you...
I hope I've inspired you to create your own Family Tree Canvas Art Piece! I would love to see it if you did make one!

Have a great weekend and Happy Father's Day to all the Dad's in your lives!

Sharing this project with Scrap it Girls - November "Tree" Challenge

Tuesday, June 12, 2012

3D Paper Cheeseburger Treat Box | Father's Day Gift for Dad | SVGCuts

While I was working on my last entry for the Father's Day SVG Cut's Facebook Challenge, I had another idea that I thought would make a cute gift for my husband from the kids. He loves cheeseburgers so I thought I could make him a gift box using SVGCuts files

 Here's how it turned out... doesn't it look yummy!

3D Paper Cheeseburger Treat Box | Father's Day Gift for Dad by ilovedoingallthingscrafty.com

Here is the cheeseburger recipe.... all cooked up with my Cameo, lol!

 I used the cupcake top and the top tier from the cake box to make my hamburger patty and the bottom of the bun. 

I made my cheese layers, using the top of the graduation cap.

From the MY DAY WITH DAD SVG KIT I made the banner.

The bacon strips are a freebie file on the SVGCuts blog, and the sesame seeds were made in the Silhouette Studio DE program. WOW! That's a lot of ingredients!!! Oh yes, to make it taste and look even better I used a green ribbon to make some lettuce and hot glued it to the top of the bun. I also inked some edges and embossed a few things, et voila... Dad's cheeseburger!

3D Paper Cheeseburger Treat Box | Father's Day Gift for Dad by ilovedoingallthingscrafty.com

I love that it's functional too! It has enough room for some treats and maybe even some love notes from the kids!

3D Paper Cheeseburger Treat Box | Father's Day Gift for Dad by ilovedoingallthingscrafty.com

You could also make this cheeseburger with two gift compartments by turning the bottom bun into a box as well!

3D Paper Cheeseburger Treat Box | Father's Day Gift for Dad by ilovedoingallthingscrafty.com

I always love to show you the scale... pretty realistic, almost good enough to eat!

3D Paper Cheeseburger Treat Box | Father's Day Gift for Dad by ilovedoingallthingscrafty.com

Hope you like this project, I know my husband will love this! 

Happy crafting!
Sharing with:

Friday, June 8, 2012

3D Paper Log Cabin and Boat Treat Boxes | Father's Day SVGCuts Challenge Entry | Dad's Cabin


3D Paper Log Cabin and Boat Treat Boxes | Father's Day SVGCuts Challenge Entry | Dad's Cabin

 For the last few weeks, I have been working on my Father's Day project for SVG Cut's Facebook Challenge. I finally finished it today. Yea!!!  Isn't it so, so, so cute! I just love how it all came together :) All the files were cut using my Cameo.

3D Paper Log Cabin and Boat Treat Boxes | Father's Day SVGCuts Challenge Entry | Dad's Cabin

For the cabin, I used the  PEONY COTTAGE SVG KIT

3D Paper Log Cabin and Boat Treat Boxes | Father's Day SVGCuts Challenge Entry | Dad's Cabin

First I embossed the shingles and used a pen to curl them up before I glued them down to the roof.

3D Paper Log Cabin and Boat Treat Boxes | Father's Day SVGCuts by ilovedoingallthingscrafty.com Challenge Entry | Dad's Cabin

Dad peeking through the window comes from  KATE'S SILHOUETTES SVG COLLECTION
For the log look that I created for the cabin, I simply crumpled up some card stock and then scored and inked it. I then used my hot glue gun to adhere to the sides of the box.


3D Paper Log Cabin and Boat Treat Boxes | Father's Day SVGCuts by ilovedoingallthingscrafty.com Challenge Entry | Dad's Cabin

The chimney I added comes from the SCHOOL DAYS SVG KIT

3D Paper Log Cabin and Boat Treat Boxes | Father's Day SVGCuts by ilovedoingallthingscrafty.com Challenge Entry | Dad's Cabin

The dock was created with the files from the crate from the CARAMEL APPLE PIE SVG KIT. For the lantern, I used the CRISP DAYS OF FALL SVG KIT, and simply glued it onto a wooden dowel. 

3D Paper Log Cabin and Boat Treat Boxes | Father's Day SVGCuts by ilovedoingallthingscrafty.com Challenge Entry | Dad's Cabin

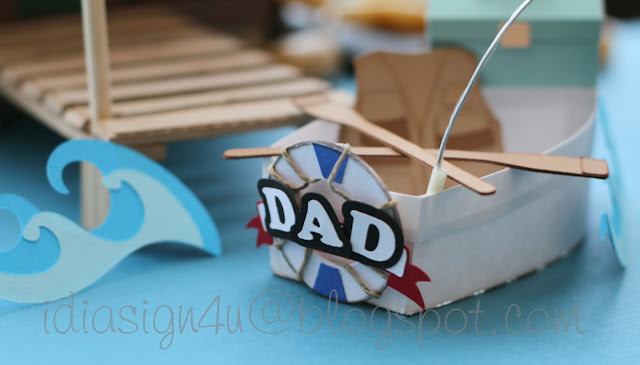
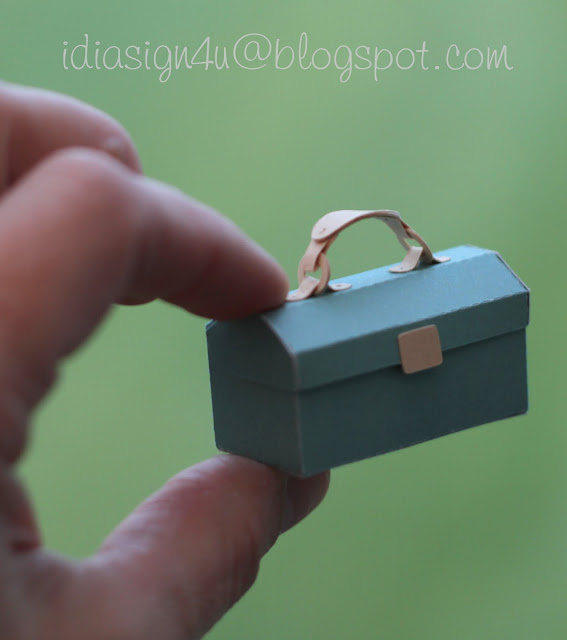
So since I didn't have a boat file, I made one up using the Silhouette Design Studio Edition software. I needed it to carry all of Dad's fishing gear! For his tackle box, I used the toolbox file from MY DAY WITH DAD SVG KIT

Dad's fishing vest, oars, fishing fly and waves are all freebies from the SVG Cuts blog... thanks, Mary! 

3D Paper Log Cabin and Boat Treat Boxes | Father's Day SVGCuts by ilovedoingallthingscrafty.com Challenge Entry | Dad's Cabin

The lifebuoy I created as well with basic shapes with the Silhouette SDE. The banner also comes from MY DAY WITH DAD SVG KIT

3D Paper Log Cabin and Boat Treat Boxes | Father's Day SVGCuts by ilovedoingallthingscrafty.com Challenge Entry | Dad's Cabin

The panfish is also a freebie from the blog. Man, they have great freebies!

3D Paper Log Cabin and Boat Treat Boxes | Father's Day SVGCuts by ilovedoingallthingscrafty.com Challenge Entry | Dad's Cabin

To make my fishing rod I used masking tape for the handle and wound the fishing line around the wire, then glued the fishing fly to the end. Easy!

3D Paper Log Cabin and Boat Treat Boxes | Father's Day SVGCuts by ilovedoingallthingscrafty.com Challenge Entry | Dad's Cabin

Here is a picture to show you the scale. So tiny, but soooo cute! It is definitely is hard to make files this small!!!

3D Paper Log Cabin and Boat Treat Boxes | Father's Day SVGCuts by ilovedoingallthingscrafty.com Challenge Entry | Dad's Cabin

I feel like a GIANT holding a tiny little boat in my hand, lol!

3D Paper Log Cabin and Boat Treat Boxes | Father's Day SVGCuts by ilovedoingallthingscrafty.com Challenge Entry | Dad's Cabin

And it all fits inside the gift box!

Hope you liked my recreation of "Dad's Cabin!" Thanks for stopping by :)

Wednesday, June 6, 2012

DIY Home Organization Station | Wall

While I was at Costco the other day I picked up a whiteboard for a Pinterest inspired project I had in mind... I had been wanting to make a home organization station/wall. Here is the project that inspired me to get organized. Click here to see how Tracy made this. 


WARNING! LOTS OF PICS TO COME!
So here is how I started my wall...

DIY Home Organization Station | Wall by ilovedoingallthingscrafty.com

The wall I am referring to and you will see at the end of the post is the wall next to my fridge in my kitchen. On that wall, I did have a very small, sad-looking eraser board. :(  I wished I had taken a picture of the wall before I took it down, oh well.

DIY Home Organization Station | Wall by ilovedoingallthingscrafty.com

This whiteboard was way too small for my liking so I thought I would turn it into a corkboard. To do this I just used double-sided tape and attached cork board sheets to it. I did have to trim cork to make it fit all together. 

DIY Home Organization Station | Wall by ilovedoingallthingscrafty.com

I had to stack 2 layers of cork together, simply because the cork wasn't thick enough... Haha, I guess I shouldn't complain too much I bought it at the Dollar Store, lol!

DIY Home Organization Station | Wall by ilovedoingallthingscrafty.com

I then covered the board with some leftover white cotton fabric that I had and secured it with hot glue. I could have left it all white but it just looked so boring so I thought I would paint a frame around it. I used some masking tape to outline the frame.

DIY Home Organization Station | Wall by ilovedoingallthingscrafty.com


DIY Home Organization Station | Wall by ilovedoingallthingscrafty.com

Using a foam brush and acrylic black paint I painted all around the board, ensuring to pull in the paint from the masking tape. This will prevent the paint from bleeding underneath the tape.

DIY Home Organization Station | Wall by ilovedoingallthingscrafty.com

The finished corkboard!

DIY Home Organization Station | Wall by ilovedoingallthingscrafty.com

Here is the magnetic whiteboard I picked up at Costco.

DIY Home Organization Station | Wall by ilovedoingallthingscrafty.com

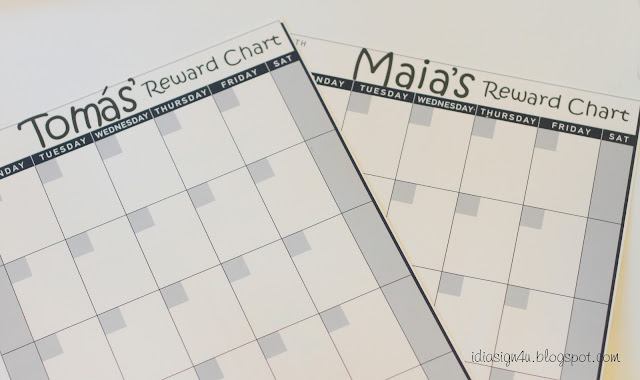
I had these desktop calenders that I turned in to a monthly reward chart for my kids. I used my Cameo to cut the words out of vinyl. I adhered these to my new magnetic whiteboard with double-sided tape.

DIY Home Organization Station | Wall by ilovedoingallthingscrafty.com

So here is what it looked like before I added all papers to it that was on my fridge...

DIY Home Organization Station | Wall by ilovedoingallthingscrafty.com


DIY Home Organization Station | Wall by ilovedoingallthingscrafty.com

And here is my wall after I added all our important school/house stuff. Not bad... I'm sure it will get a lot messier soon enough! I wished I had done this earlier on in the school year!!!

DIY Home Organization Station | Wall by ilovedoingallthingscrafty.com

Corkboard in use!

DIY Home Organization Station | Wall by ilovedoingallthingscrafty.com

Kids' reward chart!


They can earn up to $1 a day, but they can also lose that money for breaking any rules. I minus 20 cents for each broken rule! So far they haven't gone into the negatives... yet!!! 

DIY Home Organization Station | Wall by ilovedoingallthingscrafty.com

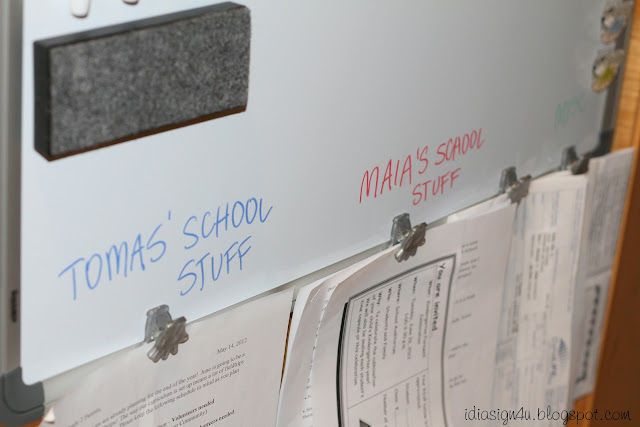
I hot glued some clips to the bottom edge for things I have to deal with.

DIY Home Organization Station | Wall by ilovedoingallthingscrafty.com

To make the pens stick to the board I cut up a small piece magnetic strip and hot glued it to each cap.

DIY Home Organization Station | Wall by ilovedoingallthingscrafty.com

I also added a magnetic strip to the eraser.


The best part is that you can't even see the wall from the kitchen area and my fridge is paper free! 

Hope you like this post and were inspired by it just like I was with Tracy's post! 
Happy crafting!