Monday, October 7, 2013

Despicable Me 2 Minion Cake | DIY Cakes

I am super excited to share with you all the Despicable Me 2 Minion Cake I made for a double birthday party this past weekend! My Goddaughter Stella chose the theme for the party. My sister also turned 20 this week so the families got together for their joint party! So of course, I brought the cake ;)

Here is your first look of many pics to follow! Doesn't he look excited?!

Despicable Me 2 Minion Cake | DIY Cakes

My Goddaughter Stella turned 4, I thought it would be cute to have the Yellow Minion hold 4 candles and have the top portion of the cake represent her. While the bottom Minion, was made for my sister Catarina who turned 20 this week!

Really happy about how it all came together!

Despicable Me 2 Minion Cake | DIY Cakes

Top View

Despicable Me 2 Minion Cake | DIY Cakes

Close Up

Despicable Me 2 Minion Cake | DIY Cakes

 The Top Yellow Minion Cake - Chocolate cake frosted with chocolate buttercream icing
baked in a 6 inch round pan (3 layers) - measured around 9 inches tall

Bottom Purple Minion Cake - Vanilla Cake - Vanilla buttercream icing
baked in an 11 inch round pan (2 layers) - measured 4 inches tall

All covered with Fondant

Despicable Me 2 Minion Cake | DIY Cakes

Thanks so much for stopping by! I hope you liked my take on Despicable Me 2's Minion Cake! I had a lot of fun making it and a better time eating it!!! Yummo!

Happy Crafting! :)

Wednesday, October 2, 2013

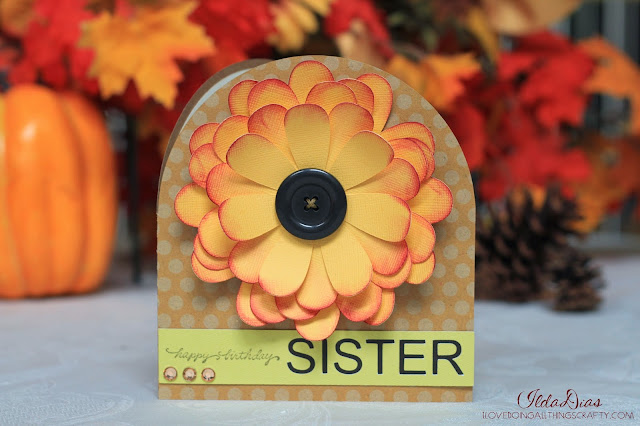
Fall Flower Birthday Card | SVGCuts


Hi Everyone!

This past Monday, my baby sister graduated from being a teenager! That's right, I have a 20-year-old sister! She's the baby of the Family, came along when I was 17! Who knew my parents were still doing "it" LOL, it sure did surprise my brother and me! Now 20 years later, my kids adore her and think she's the coolest Aunty!  Happy Birthday Catarina WE love you!

We had gone away for the weekend and I had no time to get something ready before we left, so I needed a really quick card! Since she is a Fall baby I thought it would be nice to make her a Fall Birthday Card. This card was super easy a quick to put together, it must have taken me less than 20 minutes including choosing the papers! 

Fall Flower Birthday Card | SVGCuts File

The only thing I did to alter this card was cut out the word "SISTER" on the strip and then cut out another contrasting layer to adhere to it. The files for the card comes from SVGCuts Cards for Mom SVG Kit cut on my Silhouette Cameo.

Speaking of SVGCuts.... did you know that they were the Grand Prize winner in the Martha Stewart American Made Awards! So happy and excited for them! Congrats Mary and Leo, what a few weeks you have had! That says so much....  if you have never purchased any of their SVG files you are definitely missing out! GO SHOP NOW!!! They are truly one of a kind! 


Thanks so much for stopping by! I hope you liked my take on my Sisters' Fall Flower Card...  I love how it turned out, hope you did too!

Happy Crafting :)

Monday, September 30, 2013

Baby Feet Shadow Box Keepsake - DIY Tutorial

Hi All! Today I want to share with you something that I have been meaning to show you for a while now. I'm talking about Baby Feet! I think Baby Baby Feet are the cutest things ever. Don't worry, it's not a foot fetish... I don't like all feet, only tiny ones ;)

So even before Pinterest was around I had made these shadow boxes of both my children's feet! The one on the left is my son Tomas' at 1 month old (2004) and the one on the right is my daughter Maia's feet also at one month old (2006). They are both soooo very different! The 8x10 frames I used below were bought at IKEA. Now that my kids are older they love to see how small they really were. Today I will share with you how to make your own. You may want to pin this if you have a baby in your life or on its way! Those little tiny feet eventually get huge and not so cute, so if you want to remember how they used to be you might want to give this craft a try!

Baby Feet Shadow Box Keepsake - DIY Tutorial

Very good friends of ours recently had a baby, we were so thrilled when they asked Us to be his God Parents! As a gift to them, I wanted to make little Cristiano his own Baby Feet Shadow Box. 

Baby Feet Shadow Box Keepsake - DIY Tutorial

Here is how you can make your own... 
You will need two people for this project. (Dad can hold baby, while mom gets crafty, lol!)
  1. You will need a 3D Mold Kit. The one I used was by Precious Impressions that I bought at Micheal's Craft Store. Follow the instructions as directed to create your 3D impression. 
  2. Once your impressions have dried, carefully remove the mold. It just peels right off. Because I wasn't too concerned about the top of the feet, those air bubbles don't really bother me. You can always go back and fill those air bubbles in with more plaster. 
  3. With a serrated knife I carefully shaved the top of the feet to the depth of my shadow box. You may at this point also sand an smooth down any imperfections that turned up from your molding process (bumps, air bubbles). Once I knew they would fit in the shadow box I brushed the excess dust off with a paintbrush.
  4. Next, I took some white acrylic paint and covered the entire surface of each foot. (Bottom first until dry and then the tops).  You may want to do two coats to ensure proper coverage. Paint will dry quickly because of the plaster being so porous.
  5. This step is optional but it will seal your feet forever... In a well-ventilated room, place your feet on some cardboard or newspaper. Spray your feet with a sealant Gloss Spray Sealant. If you don't like the gloss look there are mate sealants available. Let the feet completely dry. Once they are completely dry, you are ready to frame them! (I waited another 24 hours).

Here is a close up of the tiny foot! Not so tiny zoomed in, but you can see all his little creases and bumps on his feet. To mount them in the frame I used hot glue and adhered it to card stock.

Baby Feet Shadow Box Keepsake - DIY Tutorial

Before framing the feet I etched Cristiano's name into the glass. Click here for a tutorial of glass etching.

Baby Feet Shadow Box Keepsake - DIY Tutorial

Here is the finished Shadow Box. Love how it turned out! Aren't those little feet so precious? The possibilities are endless with these molds. Frame whatever you like, now that you know how!

Baby Feet Shadow Box Keepsake - DIY Tutorial

I hope this has inspired you to capture some of your own memories! A Keepsake that your child will treasure forever. If your kids are older, it's not too late! Make one of them now or do the whole family (Hands, feet whatever you want to frame)... years from now they will see how small they were at that point in time!

Thanks so much for stopping by!
Happy Crafting :)

Tuesday, September 24, 2013

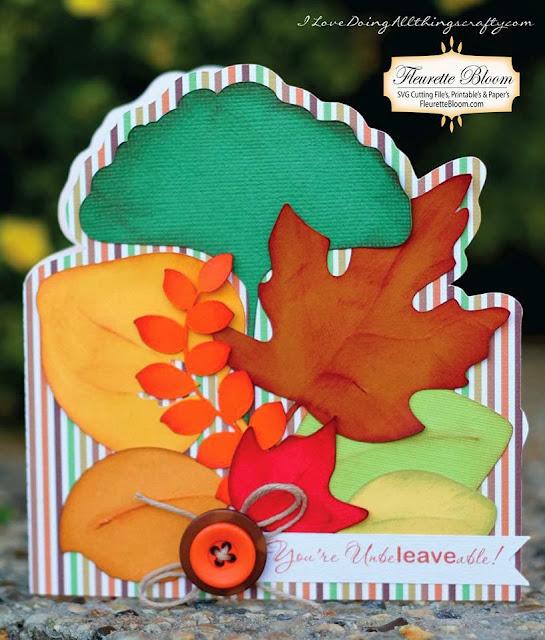
Fallen Leaves Card

Yay... The fall is here! My favorite season, the leaves outside are starting to turn colors! Here in my part of Canada, we get a very early and quick season... who knows we could get snow next week, lol! :( I sure hope NOT! Well while it's here I plan to enjoy it!

This month Fleurette Bloom and Trendy Twine have teamed up! So, today I want to share with you another one of my design team projects :)

Fallen Leaves Card

Here is a really fun Fallen Leaves Card I made. Isn't she purty? 

Here is the recipe:
Electronic Cutting Machine (I used the Silhouette Cameo with the SSDE)

Fallen Leaves Card

I created the shaped card by laying out my leaves in the Silhouette's workspace and then created an offset of the grouped image I had laid out. Then I welded a square to the bottom of the offset image to create the base of the card. The next thing you need to do is create a copy of that image and flip horizontally. Line it up at the center, slightly overlapping the image, and then weld them together (make sure the bottom is lined up first). This will become your crease line. Flood your image with the Digi paper of your choice, then use the print and cut feature of your machine. I also created the sentiment tag, using print and cut on the Silhouette. 

I hope you were able to follow along. Feel free to ask questions if you didn't ;)

Thanks so much for stopping by! Make sure you stop by Fleurette Bloom's blog to see some more fun creations from the design team!

Happy Crafting :)


Monday, September 23, 2013

Autumn "love" Flower Shadow Box Tutorial | SVGCuts

Happy Fall Everyone!!!

Fall has always been my favorite time of year, I just love the warm colors of nature and the gorgeous flowers of the season! Today, I want to share with you a little wedding gift I made for a very special couple that celebrated their wedding this past weekend. Hope they'll like this little gift :)

Autumn "love" Flower Shadow Box Tutorial | SVGCuts Files

Here is how you can make your own... 

(You will need an electronic cutting machine, I used the Silhouette Cameo with the Silhouette Studio Designer Edition)
  • To create this shadow box, first, create a square the size of the opening of the frame. 
  • Next, select a heart SVG file, I used one from LOVE ME DO SVG KIT here as my template. Enlarge the heart until you are happy with the size. 
  • Then select all the flowers you would like to use. With each flower, ungroup them and place each layer on top of each other so that you can see how they would look like in the end. 
  • Resize each flower then place them on top of the heart. This will give you an idea of how it will look and show you how many you may need to cut out.  
  • Next step, select your papers and cut all the flowers out. I inked some of my flower petals to add some extra colors and add dimension.
  • Once you have all your flowers assembled, arrange them on the heart template as you like. I used hot glue to secure them down to my heart template. 
  • Select the color of your background and cut it to fit your frame. Center the heart and adhere it to your background. 
  • Place the flowered heart inside your shadow box frame. If you want to you can skip the next step and you are done!
Autumn "love" Flower Shadow Box Tutorial | SVGCuts Files
  • The next thing I did was etch the glass with the word "love" written in the center of the heart. See here some of my previous tutorials.

A little bit of work but the results are amazing! Here is a close-up of the flowers... don't the flowers look so realistic!?!

Autumn "love" Flower Shadow Box Tutorial | SVGCuts Files

Want to know where these gorgeous flower files came from... SVGCuts of course! 

Here are all the kits I used for this project:


I'm so happy that what I had envisioned turned out even prettier than what I imagined! I love how it turned out so much, I think I want to make one for myself now! Hubby and I got married in the Fall as well, so this would be perfect for us... it will be 15 years in a few weeks, woohoo!

Congratulations to all getting married this Fall or celebrating an Anniversary this season... this one is for you :) I hope you enjoyed it!

Thanks so much for stopping by!
Happy Crafting :)

Monday, September 16, 2013

Skull Card

Have you started thinking about Halloween yet? After making this project, I'm getting the itch to pull out all my Halloween stuff already!

This month Fleurette Bloom has paired up with Trendy Twine! So today I want to share with you this Skull card I made using awesomeness from both these companies :)


The Skull file comes from Fleurette Bloom's "Skull Girl"
The twine I used is called orangesicle from Trendy Twine. Love their twine!


The card was super easy and quick to put together! I cut the word "BOO" out from the top black layer, wrapped some twine around the same black layer to create the spider's web. For fun, and I created some crazy eyeballs by gluing some twine around a couple of buttons. Easy card... right?

Stay tuned this month for more fun from Fleurette Bloom and Trendy Twine!

Thanks so much for stopping by today!
Happy Crafting :)

Thursday, September 5, 2013

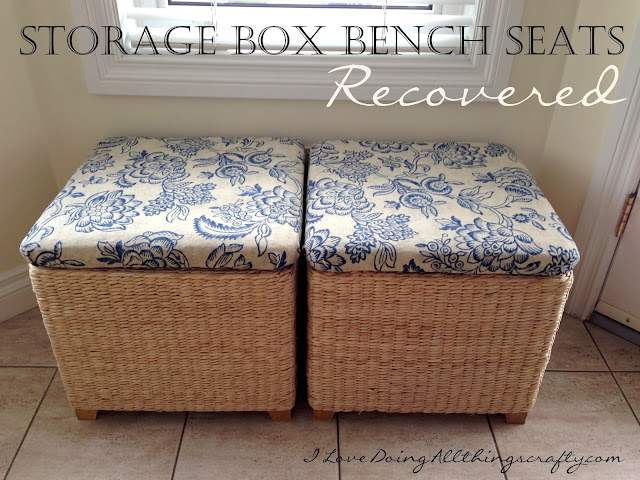
Storage Box Bench Seats Recovered | DIY Tutorial


Storage Box Bench Seats Recovered | DIY Tutorial

Hi Everybody! Now that the kids are back in school I have a little more time for my DIY projects... Woohoo, I love DIY projects! Today, I'm going to share with you how I quickly and easily I recovered these storage box seat covers for my dear mother.


My parents have had these Raffia (I think that's what they are made of) storage box/seats for years now. They are where everyone sits when they need to put on their shoes on in the mud room.


They have been sat on so many times, the seats were starting to fall apart. So, my mom asked if I could help her recover them, I was all over that idea. Luckily, she had leftover fabric from when she made her kitchen valences, so absolutely no money was spent on this project!

Here is a pictorial of how I covered the seats. I even show you how to do those hard to do corners!


  1. Cut the fabric large enough to wrap around the side of the seat. 
  2. Fold the cut seam, and staple it as close to the edge as possible, start in the middle and work your way to the edge. Ensure you pull the fabric taut before stapling on opposite sides. 
  3. Once you reach the corners, place a staple diagonally on each side of the fabric. 
  4. Cut off excess fabric, this makes it less bulky at the corners. 
  5. Pull, fold and tuck the corner. 
  6. Staple as much as you need to finish and secure the corner. Finish the remaining corners the same way. Easy!  


And here they are... Don't they look awesome! I placed them at the back exit in the nook area, just to show you how they fit so well with the rest of my parent's decor. Hopefully, I have added many more years to them!

Thanks so much for stopping by, love to hear from you! 
Happy Crafting :)

Monday, September 2, 2013

Back to School Project Ideas | Teacher and Student Gifts


I hope everyone is enjoying the long weekend... I, unfortunately, have to work today... yup, the life of a nurse! Today, I wanted to share with you some of the back to school projects that I made for the kids and teachers over the last few years.

Are your children back to school yet? Are you all sad or are you all doing the happy dance? My kids started school last week, thankfully it went better than expected, only a few tears were shed... and hopefully no more this week!


This teacher's Apple was the very first SVG Cuts project I had ever made, way before my blog and way before I had my Silhouette! My how far I have come and learned from those days! This file is actually a pumpkin that I made to look like am an apple, before Mary had created an apple of her own! The file comes from the PICK A PUMPKIN KIT here.


Here is the second project I made from SVG Cuts... never shared before! This one comes from SVG Cuts Miss Karen's Back to School SVG Kit. The worm from the apple also comes from here!


I was so excited when SVGCuts came out with an actual Apple file! Click here for all the details from a previous post.


Here are some teacher appreciation gifts I made for the end of the school year a few years ago.


Find out how I also created these etched glasses here!


Here are some personalized water containers I made for my kids a while ago... now they take them to school each day to stay hydrated!


This has got to be one of my favorite projects! See how I made this DIY Canvas bag, so easy and useful!


Stay organized with this super quick project! DIY Desk organizer, your kids will love it... you may too!


If you've been following my blog you'll know this was a recent project I made for my son's teacher this year. 3D sneaker... so cool!


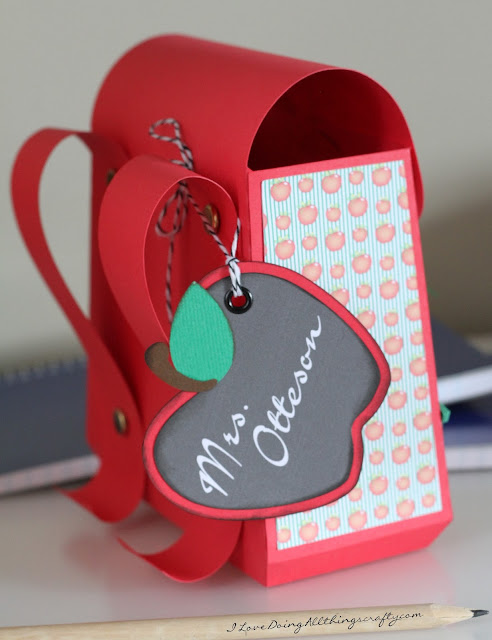
And finally here is the cute little backpack I made for my daughter's teacher this year. The perfect little bag to stuff with treats!

Well, there they are... Back to School Project Ideas, sure to put a smile on someone's face :) Hopefully, they have inspired you to share with someone headed back to school!

Thanks so much for stopping by today!
Happy Crafting :)


Tuesday, August 27, 2013

3D Paper Back Pack | SVG Cuts

My kids start school already tomorrow, where has the summer gone *as I dry weepy eye's*  :( 
So for today, I want to share with you all this cute 3D Paper Back Pack I made for my daughter's teacher!


This awesome file from SVG Cuts is super quick and easy to put together. 
The file comes from their Back to the Books SVG Kit. The cute patterned paper I used is from Fleurette Bloom's School Days Paper Pack. If you're still looking for last-minute school projects you should definitely check out these links!


Here's a closer look! The backpack is the perfect size to fill up with a few goodies. Great for someone headed back to school!


I hope her teacher is gonna love it as much as I do! Also, if you haven't yet check out the cool 3D sneaker I made for my son's teacher!

Thanks so much for stopping by today!
Happy Crafting :)

Wednesday, August 21, 2013

Baby Carriage Shaped Card | SVG Cuts

Very good friends of ours recently had their baby boy. I'm super excited for them! Congratulations Vic and Emilia your newest blessing... Cristiano!

Here is the card I made for them.


 The file comes from SVGCuts Bundle of Joy SVG Kit. I used the carriage file from the extras folder to create this shaped card. Real quick and simple to make!


I hope you liked this cute shaped card. Thanks for coming by today!
Happy Crafting :)