Showing posts with label Teacher. Show all posts

Tuesday, December 20, 2016

Christmas Coffee Cup Gift Card Envelopes and Cards for Teachers


Hey All! 

Sorry I have been MIA for a few weeks. The Christmas craze has come over me and has left with little time for crafting!

So today I have a card and some Coffee Cup Gift Card Envelopes I made for the teachers to share with you! So cute and really quick to make. If you are still looking for a last minute gift idea, there is still plenty of time to make these!


For the card background, I wanted to create a stitch sweater look. So I used MFT stitched line dies to achieve the look I wanted. Really love how it turned out!
For the full list of products I used please check out the links below the post.

These Coffee Cup Gift Card Envelopes will be perfect for those Starbucks gift cards that teachers need for their daily dose of Java!


I filmed the process video... so for those that like to watch, this is for you!


Click -> HERE to watch in HD

Hope this has given you some crafty gift ideas for those coffee loving friends in your life :)


Thanks for stopping by!
Happy Crafting  :)

SUPPLIES 
To make supplies easy to find, I have linked them below. If something I used is no longer available I will link to a similar product. Affiliate links may be used depending on the product. Your purchases help keep my blog running, so thanks in advance for the support!

SSS Card Stock 24 Colors
Shop at:
SSS
Inkadinkado Embossing Magic
Shop at:
SSS | AMZ
MFT BASIC STITCH LINES Die-Namics
Shop at:
SSS
Simon Says Stamp SENDING Wafer Die
Shop at:
SSS
MFT COFFEE CUP Die-Namics
Shop at:
SSS
SSS SCALLOP STITCHES Wafer Dies
Shop at:
SSS
SSS GIFT CARD ENVELOPE Craft DIE
Shop at:
SSS
SSS 3.5 Inch ACRYLIC BLOCK
Shop at:
SSS
VersaMark Watermark Stamp Pad
Shop at:
SSS | AMZ
Craftin Desert Divas - Simply Christmas
Shop at:
CDD
WOW! Embossing Powder Clear Gloss
Shop at:
AMZ
Black & Decker HG1300 Dual Temperature Heat Gun
Shop at:
AMZ
Neenah 110 LB SOLAR WHITE Paper
Shop at:
SSS | AMZ
Sizzix Big Shot
Sizzix Big Shot
Shop at:
SSS | AMZ
Sizzix Big Shot Kick STANDARD CUTTING PADS
Shop at:
SSS
Sizzix Big Shot Magnetic Platform
Shop at:
AMZ
Pretty Pink Posh SPARKLING CLEAR MIX
Shop at:
SSS
Scotch Quick-Drying Tacky Glue 4Oz
Shop at:
SSS | AMZ
3M Scotch 1/2-Inch Double-Sided Foam Tape
Shop at:
SSS | AMZ
3M Scotch PINK ATG ADVANCED TAPE GLIDER
Shop at:
SSS | AMZ
Trendy Bakers Twine Starter Sampler
Shop at:
TT

Tuesday, August 27, 2013

3D Paper Back Pack | SVG Cuts

My kids start school already tomorrow, where has the summer gone *as I dry weepy eye's*  :( 
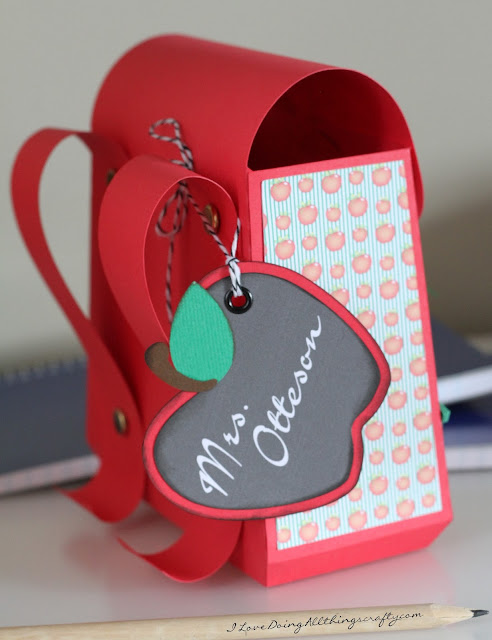
So for today, I want to share with you all this cute 3D Paper Back Pack I made for my daughter's teacher!


This awesome file from SVG Cuts is super quick and easy to put together. 
The file comes from their Back to the Books SVG Kit. The cute patterned paper I used is from Fleurette Bloom's School Days Paper Pack. If you're still looking for last-minute school projects you should definitely check out these links!


Here's a closer look! The backpack is the perfect size to fill up with a few goodies. Great for someone headed back to school!


I hope her teacher is gonna love it as much as I do! Also, if you haven't yet check out the cool 3D sneaker I made for my son's teacher!

Thanks so much for stopping by today!
Happy Crafting :)

Friday, June 21, 2013

DIY Custom Canvas Bags | Teacher Gifts

With the end of the school year quickly approaching, I thought I better get busy making some teacher appreciation gifts! The kids were very blessed to have amazing teachers once again this year. As a little thanks for all that they have done for my children, I always like to make something personal that will remind them of the kids. I hope they like them as much as I had fun making them!

This was my very first time creating something with the heat transfer material. I have to say I LOVE it! I want to create more with it! It was super easy!!!

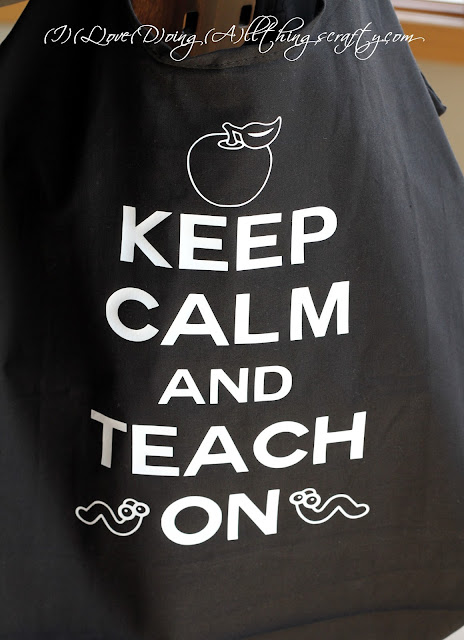
Here is the front side of the bag, I'm not sure if I will ever get tired of seeing variations of this phrase... for now, I still love it! I think the teachers will too! Click here to see another project I made using the "Craft On" version.  


DIY Custom Canvas Bags | Teacher Gifts

To the other side of the bag, I added the teacher's name. Mrs. Archer and Mrs. Attema are awesome!

DIY Custom Canvas Bags | Teacher Gifts

When they open look on the inside, they will see the kids' names... hopefully, when they see that, they will have only good memories of them... lol!

DIY Custom Canvas Bags | Teacher Gifts

The next few pics are of my daughter's bag for her teacher.

DIY Custom Canvas Bags | Teacher Gifts


DIY Custom Canvas Bags | Teacher Gifts

Here is a better look at the front design on the bag! Love those little book worms ;)

DIY Custom Canvas Bags | Teacher Gifts

Want to know how to make your own?

You will need...
Silhouette Machine and SDE software
Files (worm and apple) SVGCuts 
Silhouette Heat Transfer Material
Canvas bag (Tulip - Grab & Tote)
Iron


  • First, create the image you want to be cut on the Silhouette... here is how I did it...
    • For the image I created, I used a Couture font. Wrote the out phrase and lined it up as pictured above.
    • Next, I worked with the apple and worm file to create a border around the images by grouping different layers together and using the offset and modify functions. 
    • Once I was satisfied with the images, I resized them and positioned them next to the phrase, and made sure everything was lined up properly.
    • Group all your images together.

  • Now all that is left to do is follow the directions for the heat transfer material. Ensuring that you flip your image horizontally so that your image looks backward and setting blade depth is set correctly for the transfer material. I would advise you do a test cut first to make sure your settings are all correct. Iron on as directed. 
That is it... it's that easy! Hope you've enjoyed this DIY tutorial and project, let me know what you think and if you have any questions.

Thanks for stopping by!
Happy Crafting :)