Showing posts with label Simon Says Stamp. Show all posts

Friday, September 9, 2022

Thankful for You Floral Arrangement Card | Studio Katia - STAMPtember Exclusive Stamp Set

Thankful for You, Floral Arrangement Card, Studio Katia, STAMPtember, Grateful Florals,Simon Says Stamp,Card Making, Stamping, Die Cutting, handmade card, ilovedoingallthingscrafty, Stamps, how to,Prismacolor pencils,

Hello, my friends! 

It is time to reveal the STAMPtember Studio Katia Exclusive set for Simon Says Stamp. It is a gorgeous Fall Floral arrangement set called Grateful Florals, you can buy the stamp set alone, or if you like get them with the coordinating dies!

CARD RECIPE


Here is how this card came together:

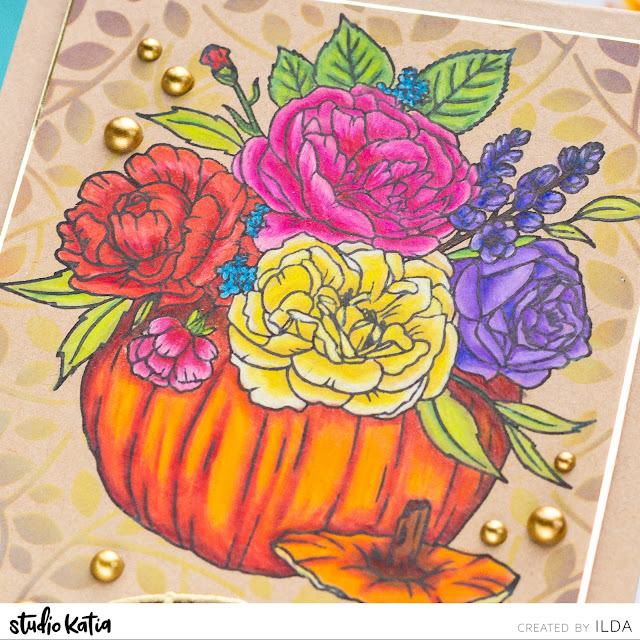
  • On Kraft cardstock, I stamped out the Grateful Florals using Blackout Ink. Leave the stamp in the Stamp positioner as you need it for re-stamping later.
  • Next, I colored in the floral arrangement using Prisma Colored pencils.
  • I then placed the finished colored image back into the Misti and restamped it with the Blackout Ink. Make sure the ink is completely dry before moving on to the next step. (Blackout ink dries quickly)
  • I then blended out a few distress Oxide Inks using the Autumn Leaves Stencil to the background. (see links below in the supply list below) 
  • OPTIONAL: Create a mask for the arrangement and or ink blend background first.  I didn't mask this as I could see where not to blend over through the stencil and I didn't want to risk pulling off or tearing anything with a mask.

Thankful for You, Floral Arrangement Card, Studio Katia, STAMPtember, Grateful Florals,Simon Says Stamp,Card Making, Stamping, Die Cutting, handmade card, ilovedoingallthingscrafty, Stamps, how to,Prismacolor pencils,

  • Once the stenciled background was dry I added the heat embossed sentiment using Gold Rush Emb. Powder. To make the sentiment stand out a bit more I added a shadow layer to the sentiment by slightly moving the position of the stamp. 
  • Next, I trimmed up the panel and added a gold shadow layer behind it before attaching it with foam tape to the kraft card base. 
  • To finish off this beauty I added some Satin Gold Pearls.
Thankful for You, Floral Arrangement Card, Studio Katia, STAMPtember, Grateful Florals,Simon Says Stamp,Card Making, Stamping, Die Cutting, handmade card, ilovedoingallthingscrafty, Stamps, how to,Prismacolor pencils,

I'm thankful for you all and I hope you were inspired by this beautiful Fall Floral Arrangement CardπŸ’–

Thankful for You, Floral Arrangement Card, Studio Katia, STAMPtember, Grateful Florals,Simon Says Stamp,Card Making, Stamping, Die Cutting, handmade card, ilovedoingallthingscrafty, Stamps, how to,Prismacolor pencils,

Happy Crafting my friends and have a wonderful weekend!
Ilda πŸ‚

SUPPLIES
Grateful Florals
Grateful Florals
Shop at:
SSS
Grateful Florals Stamp and Die
Shop at:
SSS
Autumn Leaves Stencil
Shop at:
SK
Ink Blender Brushes
Ink Blender Brushes
Shop at:
SSS | SK
Bone Folder
Bone Folder
Shop at:
SSS | SK
Satin Gold Pearls
Satin Gold Pearls
Shop at:
SSS | SK
Black Triangle Tray
Black Triangle Tray
Shop at:
SSS | SK
Embellishment Wand
Embellishment Wand
Shop at:
SSS | SK
SK Glue
SK Glue
Shop at:
SSS | SK
SK Foam Tape
SK Foam Tape
Shop at:
SSS | SK
New Mini Misti
New Mini Misti
Shop at:
SSS | SB | HBS
Blackout Ink
Blackout Ink
Shop at:
SSS | HBS | IO3
Juicy Ink
Juicy Ink
Shop at:
SSS | HBS | IO3
Gold Rush Emb. Pwd.
Gold Rush Emb. Pwd.
Shop at:
SSS | IO3
Crushed Olive Distress Oxide Ink
Shop at:
SSS | HBS
Ground Expresso Distress Oxide Ink
Shop at:
SSS | HBS
Crackling Campfire Distress Oxide Ink
Shop at:
SSS | HBS
Gold Mirror Cardstock
Shop at:
SSS | TS US | HA
To make supplies easy for you to find, I have linked them above. If something is no longer available I will link to a similar product. Affiliate links may be used depending on the product linked. Please help support my blog by using these links while shopping at no additional cost to you. For more information about the affiliates I use, please visit my disclaimer here. Thanks so much for all your support!

Friday, September 2, 2022

Ink Swiping Technique Cards for Teachers | SSS STAMPtember Blog Party

Ink Swiping Technique, Cards for Teachers, Simon Says Stamp, STAMPtember, Card Making, Stamping, Die Cutting, handmade card, ilovedoingallthingscrafty, Stamps, how to, rainbow,Pawsitively Saturated Ink Pads

Hello Crafty Friends, it's STAMPtember!!!

Are you as EXCITED for STAMPtember as I am?!? Today's post is NOT part of a Blog Hop, it is a Blog Party and everyone is invited! Make sure you stop by the Simon Says Stamp Blog for all the Party Details!

My cards are for all the teachers out there. They don't receive enough praise and the new XL Teacher Greetings Sets should help with that 😁

CARD RECIPE


I'm not going to go into much detail with these cards as they are super simple one-layer cards and all done the same way. 


If you ever need a quick background, try Ink Swiping. It is literally taking your ink pad and swiping it across the paper. For that, I used various colors of SSS Pawsitively Saturated Ink Pads. Each card was then stamped using a sentiment from the XL Teacher Greetings Set and finished with enamel of coordinating colors. 


Let's take a closer look at this rainbow set for teachers.


Inks used Guava, Watermelon, and Cherry Positively Saturated Ink Trio and SSS Intense Black Ink.


Ink Swiping Technique, Cards for Teachers, Simon Says Stamp, STAMPtember, Card Making, Stamping, Die Cutting, handmade card, ilovedoingallthingscrafty, Stamps, how to, rainbow,Pawsitively Saturated Ink Pads

Ink Swiping Technique, Cards for Teachers, Simon Says Stamp, STAMPtember, Card Making, Stamping, Die Cutting, handmade card, ilovedoingallthingscrafty, Stamps, how to, rainbow,Pawsitively Saturated Ink Pads

For this orange card, I mixed up a couple of different orange ink trios. I used Cantaloupe, Sherbert and Mandarin Positively Saturated Ink and SSS Intense Black Ink.


Ink Swiping Technique, Cards for Teachers, Simon Says Stamp, STAMPtember, Card Making, Stamping, Die Cutting, handmade card, ilovedoingallthingscrafty, Stamps, how to, rainbow,Pawsitively Saturated Ink Pads

Ink Swiping Technique, Cards for Teachers, Simon Says Stamp, STAMPtember, Card Making, Stamping, Die Cutting, handmade card, ilovedoingallthingscrafty, Stamps, how to, rainbow,Pawsitively Saturated Ink Pads


Ink Swiping Technique, Cards for Teachers, Simon Says Stamp, STAMPtember, Card Making, Stamping, Die Cutting, handmade card, ilovedoingallthingscrafty, Stamps, how to, rainbow,Pawsitively Saturated Ink Pads

Ink Swiping Technique, Cards for Teachers, Simon Says Stamp, STAMPtember, Card Making, Stamping, Die Cutting, handmade card, ilovedoingallthingscrafty, Stamps, how to, rainbow,Pawsitively Saturated Ink Pads


Ink Swiping Technique, Cards for Teachers, Simon Says Stamp, STAMPtember, Card Making, Stamping, Die Cutting, handmade card, ilovedoingallthingscrafty, Stamps, how to, rainbow,Pawsitively Saturated Ink Pads

Ink Swiping Technique, Cards for Teachers, Simon Says Stamp, STAMPtember, Card Making, Stamping, Die Cutting, handmade card, ilovedoingallthingscrafty, Stamps, how to, rainbow,Pawsitively Saturated Ink Pads


Ink Swiping Technique, Cards for Teachers, Simon Says Stamp, STAMPtember, Card Making, Stamping, Die Cutting, handmade card, ilovedoingallthingscrafty, Stamps, how to, rainbow,Pawsitively Saturated Ink Pads

Ink Swiping Technique, Cards for Teachers, Simon Says Stamp, STAMPtember, Card Making, Stamping, Die Cutting, handmade card, ilovedoingallthingscrafty, Stamps, how to, rainbow,Pawsitively Saturated Ink Pads

This next card is my favorite with the googly eyes, it just makes me laugh! πŸ˜†


Ink Swiping Technique, Cards for Teachers, Simon Says Stamp, STAMPtember, Card Making, Stamping, Die Cutting, handmade card, ilovedoingallthingscrafty, Stamps, how to, rainbow,Pawsitively Saturated Ink Pads

Ink Swiping Technique, Cards for Teachers, Simon Says Stamp, STAMPtember, Card Making, Stamping, Die Cutting, handmade card, ilovedoingallthingscrafty, Stamps, how to, rainbow,Pawsitively Saturated Ink Pads

Click → HERE To SHOP the entire STAMPtember Release and don't forget to take advantage of the FREE with purchase codes like this one πŸ‘‡ valid now until September 4 at 11:59 EDT.


Make sure you are subscribed to the Simon Says Stamp Blog so you don't miss out on any details throughout STAMPtember as they will be celebrating every day and posting exclusive collaborations, contests, prizes, special promotions, announcements, and more surprises!


Thank YOU, Heidi, and the Simon Says Stamp Family for sending me this fun stamp set to create for today's event. And, thank YOU all for stopping by and for all the support and love you have shown me.


WATCH how these came togetherπŸ‘‡

Thank you for stopping by and until next time... Happy STAMPtember!
Ilda πŸ‘‹

Wednesday, November 24, 2021

Rainbow Snowflake Shaker Cards | Sprayed Stencil Backgrounds | Simon Says Stamp

Rainbow, Snowflake, Shaker Cards,Sprayed, Stencil, Simon Says Stamp, Clear Bag,distress oxide sprays,Foiled, Card Making, Stamping, Die Cutting, handmade card, ilovedoingallthingscrafty, Stamps, how to,

Hello Friends, 

I am back today with these Rainbow Snowflake Shaker Cards featuring supplies from the Peace On Earth Release from Simon Says Stamp. The snail mail from the US to Canada is killing me... Simon Says has already had another Handmade Holiday Release since this one😱 Thankfully still plenty of time before Christmas!

I had fun creating these cards using my clear bag shaker technique, which makes the assembly process easy when making multiples.

Here is how these were made.
  • Lay the snowflake stencil onto a white cardstock panel. Since the stencil is fairly delicate and light I used tape to hold the stencil in place. 
  • Use sprays to add color to the background. Anywhere the stencil lays will remain white. I used 3 colors to create a rainbow mix using Distress Oxide Ink Sprays. (See links below)
  • Remove the stencil to reveal the background for the first panel.
  • Use the ink left on the stencil and flip it onto another white cardstock panel. Use a paper towel to press the image in place.
  • I then dipped the stencil in the excess spray and gave it a light water spritz and repeated the previous step to create another background panel.
  • Now to create the shakers themselves I used Version One of my Clear Bag Shaker Card Technique. Watch IG Reel below. Or you could easily create these cards using my original DIY Frameless Shaker Card design as well or use a premade shaker creator.
Here is a visual using a different background but the process is the same.

Below is the first background created with the sprays and the stencil over the panel. For this first card, I added an extra step to the clear bag. I used the Merry Hot Foil Plate to add the Merry using Aura Glimmer Foil to the top of the clear bag. You will need a Hot Foil System for this step or if you have a die you like you can just glue it to the front of the clear bag. I was so excited when I saw Amy Rysavy share this foiling technique on plastic in a recent post that I had to try it myself on these clear bags.

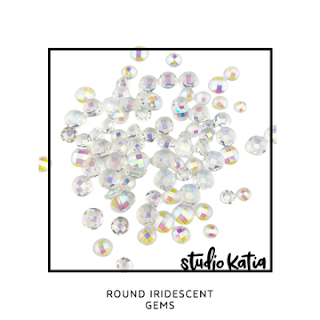
To the front of this card, I also added some more Harmony Snowflakes dies cut from Gold Foil Mirror cardstock. The Christmas Sentiment Strip comes from the Sentiment Strips Reverse Love Peace Joy set. I then finished the centers of the snowflakes with Iridescent Round Gems

Rainbow, Snowflake, Shaker Cards,Sprayed, Stencil, Simon Says Stamp, Clear Bag,distress oxide sprays,Foiled, Card Making, Stamping, Die Cutting, handmade card, ilovedoingallthingscrafty, Stamps, how to,

These next cards feature the negative results of the sprayed stencils. I think I love these backgrounds more as the snowflake images are more visible. For these cards, I used sentiments from the Sentiment Strips Love Peace Joy, and added a Silver Mirrored Cardstock  Harmony Snowflake Dies to the fronts.

Rainbow, Snowflake, Shaker Cards,Sprayed, Stencil, Simon Says Stamp, Clear Bag,distress oxide sprays,Foiled, Card Making, Stamping, Die Cutting, handmade card, ilovedoingallthingscrafty, Stamps, how to,

And finally, this last card was done exactly as the previous one only using a different sentiment. 

Rainbow, Snowflake, Shaker Cards,Sprayed, Stencil, Simon Says Stamp, Clear Bag,distress oxide sprays,Foiled, Card Making, Stamping, Die Cutting, handmade card, ilovedoingallthingscrafty, Stamps, how to,

I know I have a shaker problem and I am slowly working through my issues one shaker at a time πŸ˜‚ But honestly I am so happy to finally use the sequins and shaker bits that have I have been hoarding for years, and I still haven't really made a dent in them. I hope these fun-filled Rainbow Snowflake Shaker Cards inspired you today.

Don't forget to check out these fabulous deals happening now from Simon Sats Stamp.


Thank you for stopping by and until next time... Happy Crafting!
Ilda ❄

SUPPLIES
Snowflake Cluster Stencil
Shop at:
SSS
Harmony Snowflake Dies
Shop at:
SSS
Merry Hot Foil Plate
Shop at:
SSS
Sentiment Strips Love Peace Joy
Shop at:
SSS
Sentiment Strips Reverse Love Peace Joy
Shop at:
SSS
Neenah Solar White 110lbs
Shop at:
SSS | AMZ | HBS
Mermaid Lagoon Distress Oxide Spray
Shop at:
SSS | HBS
Picked Raspberry Distress Oxide Spray
Shop at:
SSS | HBS
Squeezed Lemonade Distress Oxide Spray
Shop at:
SSS | HBS
Slimline Cello Bags
Slimline Cello Bags
Shop at:
HBS
Trimmer
Trimmer
Shop at:
SSS | AMZ | SB
AURA Glimmer Foil
AURA Glimmer Foil
Shop at:
SSS | SB | SB
Hot Foil System
Hot Foil System
Shop at:
SSS | SB | SB
Platinum 6 Die Cutting Platform
Shop at:
SSS | SB | SB
Gold Mirror Cardstock
Shop at:
SSS
Silver Service Pad
Silver Service Pad
Shop at:
SSS | SB | HBS | TS US | HA
Tear Tape XL Roll | 1/4
Tear Tape XL Roll | 1/4"
Shop at:
HBS
Black Foam Dots 1/4
Black Foam Dots 1/4"
Shop at:
HBS
Black Triangle Tray
Black Triangle Tray
Shop at:
SSS | SK
Bee Creative Glue
Bee Creative Glue
Shop at:
SSS | SB | HBS
Iridescent Round Gems
Shop at:
SSS | SK
Stars Glitter
Stars Glitter
Shop at:
SSS | SK
Majestic Fusion
Majestic Fusion
Shop at:
SSS | SK
To make supplies easy for you to find, I have linked them above. If something is no longer available I will link to a similar product. Affiliate links may be used depending on the product linked. Please help support my blog by using these links while shopping at no additional cost to you. For more information about the affiliates I use, please visit my disclaimer here. Thanks so much for all your support!

Wednesday, March 24, 2021

Cherry Blossom Shaker Card | Simon Says Stamp

Card Making, Stamping, Die Cutting, handmade card, ilovedoingallthingscrafty, Stamps, how to,

Hello, again my friends!

Happy you have joined me for today's beautiful Cherry Blossom Shaker Card. This card features the new SWEET GARDEN CHERRY TREE Frame Die from the All the Feels Release from Simon Says Stamp.


Before I tell you how this came together, let me tell you a secret... sometimes when I don't have time to color perfectly, I add glitter! Yes, glitter is your friend, not only does it add that extra sparkle, but it also covers up any imperfections in your coloring. Remember that the next time you aren't crazy about how you coloredπŸ˜‰ If you want to see a little video clip I shared on Instagram click HERE.

CARD RECIPE
 (All ingredients linked below in the supply list)
  • Die-cut two or three layers of the SWEET GARDEN CHERRY TREE Frame Die
  • To one of the frames, color in the flowers and the stem using Copic or other markers. I used a dark pink in the center and then blended it out with two lighter shades of pink leaving the outer petals white. 
  • Next, I used a red fine tip sharpie to add some red dots to the center. 
  • Add a thin layer of glue to the top of each flower and sprinkle on glitter. Shake excess off.
  • Glue the layers together and add a piece of acetate behind the frame. 
  • Add thin strips of foam tape along the outer edge. 
  • Set aside to work on the background.
Card Making, Stamping, Die Cutting, handmade card, ilovedoingallthingscrafty, Stamps, how to,
  • Using distress oxide inks blend out the sky (see supplies linked below for all the colors used).
  • Add your sequin bits to the center of the panel.
  • Adhere the cherry blossom frame to the background enclosing in the shaker pieces.
  • Attach to a card base.
  • Embellish the flowers by adding a jewel to the center of a small sequin to the center.
  • Add a sentiment. This hello comes from the SSS HELLO BEAUTIFUL GORGEOUS Wafer Dies that was die-cut 3 times, stacked, and glued together.
Card Making, Stamping, Die Cutting, handmade card, ilovedoingallthingscrafty, Stamps, how to,

How pretty does that look? I just love the results and the fact that it took me no time to color the flowers. 

I hope you were inspired by this Cherry Blossom Shaker Card. Thank you Simon Says Stamp for sending me this beautiful die to play with.


Thank you for stopping by and until next time... Happy Crafting!

SUPPLIES


SWEET GARDEN CHERRY TREE

Shop at:
SSS
SSS HELLO BEAUTIFUL GORGEOUS Wafer Dies
Shop at:
SSS
GEMINI JR. DIE CUTTER
Shop at:
SSS | SB
NEENAH SOLAR WHITE 110
Shop at:
SSS | AMZ | HBS
COPIC SKETCH
COPIC SKETCH
Shop at:
SSS | AMZ
INK BLENDER BRUSHES
INK BLENDER BRUSHES
Shop at:
SSS | SK
Oxide Ink Pad WILTED VIOLET
Shop at:
SSS | SB | HBS
Oxide Ink SHADED LILAC
Shop at:
SSS
Oxide Ink Pad PICKED RASPBERRY
Shop at:
SSS | SB | HBS
SQUEEZED LEMONADE DISTRESS OXIDE
Shop at:
SSS | SB | HBS
CLEAR ACETATE SHEETS
Shop at:
SSS | SK
Scor-Tape 0.25 Inch
Scor-Tape 0.25 Inch
Shop at:
SSS | AMZ | HBS
FOAM TAPE - WHITE
FOAM TAPE - WHITE
Shop at:
SSS | SK
ZIG Glue Pen FINE TIP Two Way Acid Free
Shop at:
SSS | AMZ
SPARKLE GLITTER
SPARKLE GLITTER
Shop at:
SSS | SK
CRYSTAL CLEAR FUSION SEQUINS
Shop at:
SSS | SK
MAJESTIC FUSION
MAJESTIC FUSION
Shop at:
SSS | SK
IRIDESCENT BUBBLES
IRIDESCENT BUBBLES
Shop at:
SSS | SK
IRIDESCENT BUBBLES TINY
Shop at:
SSS | SK
To make supplies easy for you to find, I have linked them above. If something is no longer available I will link to a similar product. Affiliate links may be used depending on the product linked. Please help support my blog by using these links while shopping at no additional cost to you. For more information about the affiliates I use, please visit my disclaimer here. Thanks so much for all your support!