Monday, May 27, 2013

Winnie the Pooh Cake

Happy Memorial Day to all my American Friends hope you are all enjoying the holiday!

Today, I would like to share with you a cake I made for my friend Karen's little boy. William turned 1 this past weekend and I had the honor of making his very first Birthday Cake! Yay, Will!

What 1 year old doesn't love Winnie the Pooh?! Isn't he cute??? I love how it all came together. Winnie is all made of fondant and the center of his body is Rice Krispies treats. Totally edible if Will wanted to take a bite, lol!

Winnie the Pooh Cake

Here are a few more pics of the cake... close up and from different angles. 

Winnie the Pooh Cake
Aren't those bumblebees just the cutest little things?

The inside of the cake had a chocolate flavored bottom layer and a yellow cake top layer, iced and with vanilla buttercream. It was finished and decorated with fondant. Measured 10 inches in diameter and approximately 4 inches high (not including the toppers). 

Happy Birthday, Will, hope you have an amazing year! 

Thanks for coming by, if you are planning on making a Winnie the Pooh cake hopefully I have inspired you!

Happy Crafting :)

Wednesday, May 22, 2013

Lily Pad Shape Card | Ink On 3

HELLO!!! I am so excited to share with you my first Fleurette Bloom Design Team project today!

Here is a very quick card I made using some elements from Fleurette Bloom's latest Swan Lake Element Collection. The coolest part was making the coordinating envelope with the Swan Lake Digital Paper Collection. Love how turned out, so elegant... if a card can be that, lol!


I have owned my Silhouette Cameo for over a year now but had not really been using the machine to it's fullest potential! For some reason, I was always intimidated to use the fill pattern option of the program... well not anymore! All it took was one time and I am hooked! I will be using a lot more digital papers now!!! SO easy, can't believe it took me this long! Just look at how pretty the envelope is! I think it adds so much and, makes the card just that much more special! Don't forget to stop by Fluerette Bloom's Shop and check out all of her beautiful digital coordinating papers!  

Here it is again from a different angle. Isn't it SO pretty? It looks so much like the real thing! 


Take a look inside. I added a white inset layer... this adds a little extra strength and stability to the card... also makes it easier to see what is written when a darker color is used.


Here is a screenshot of how I turned the lily pad element into a shape card. If you are a visual person (like me) you'll appreciate this! It's true... a picture IS worth a thousand words!


To make this simple, I placed all my steps in one screenshot. I'll start of with the top left image of the lily pad and work clockwise.

  1. Import your lily pad base, this will then become the bottom part of the front of your card.
  2. To create the back of my card, first I copied and pasted the lily pad. Next, I drew a straight line down the side of the card and then changed the style of the line to a dash. Group them together. 
  3. Copy and paste image 2. Take your knife tool and cut the piece off just after the dash line you just created. Delete the piece with the dash line. 
  4. To create the piece that lines the inside of the card, click on the image you created in step 3, and select the internal offset option. I set my offset at 0.1 inches.

And that is how easy it is to create a shape card! Now all that is left to do is cut out all your pieces and assemble. 

Dimensions:
  • Envelope - 9.910" H x 6.380" W
  • Lily Pad - 4.425" H x 4.620" W 
  • Lily Pad top layer - 4.355" H x 4.555" W
  • Large Flower layer - 4.080" H x 4.270" W (highlight all flower layers when adjusting the measurements to keep them all proportional)
  • Sentiment Base - 0.940" H x 2.895" W
NOTE:
  • You could stop after step 2,  if you don't want to create the liner for the inside of your card. If you do, simply just cut the pieces out and place glue to the left of the dash line. Line up with the front piece of the card and press together! 
  • Don't forget you can also use the print and cut option to create the lily pad and flower if you decided not to make it 3 dimensional! 

I hope you liked my Lily Pad shape card, and have learned how to make your own... at least the way I do. I'm sure there are so many other ways! Make sure you stop by Fleurette's Blog or Facebook page today because she has got some exciting news to share with her fans!


Thanks for stopping by, leave me a comment... love to hear from you! 

Sunday, May 12, 2013

Tea Set Treat Boxes | 3D Paper Teapot and Teacup | SVGCuts

Happy Mother's Day Everyone! Hope you all are able to spend time with your children and Mother's today! 
Today, I would love to share with you the tea set I made for my Mothers! 
Since my mother collects Teapots (real ones) can you guess which one she'll get, lol? And, you can't forget the Mother In Law... mine loves to drink tea! The decision was easy! I LOVE you both very much!!!
Tea Set Treat Boxes | 3D Paper Teapot and Teacup | SVGCuts

The files come from SVG Cuts, Tea for You and Me SVG Kit
Cut on the Silhouette Cameo.
If you are a subscriber to the Cutting Edge Magazine, you would have seen this project in the March/April Issue. If you're not, this magazine is unique in that it is dedicated to all electronic die-cutting machine users and paper craft addicts like me! So check it out, and you'll get to see more of my work!!!

Thanks for stopping by today!
Happy Crafting :)


Friday, May 10, 2013

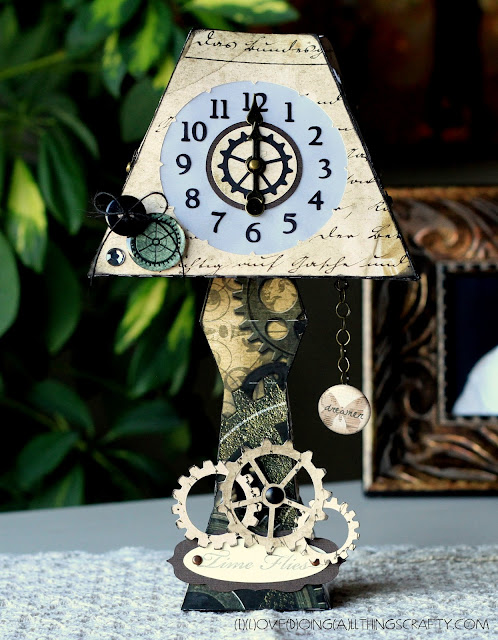
Paper Clock Lamp | SVGCuts Challenge Entry

Hello Everyone and WELCOME to all my new followers! SO happy to see new faces on this little blog of mine! Make sure you leave me a comment and say HI so I can get to know you as well!

Today, I want to share with you my second attempt at the SVG Cuts Facebook Lamp Challenge! This time around I stuck to the rules, LOL! My inspiration came from the paper used, DCWV Tattered Time Stack. I love the vintage, "MAN"ly look of it! 

So here is my lamp, LOVE how it turned out :)

Paper Clock Lamp | SVGCuts Challenge Entry

The files I used all came from SVGCuts, Maison de Madeline SVG Kit. I've been wanting to make the wall clock and thought why not incorporate it in the lamp. 

Paper Clock Lamp | SVGCuts Challenge Entry

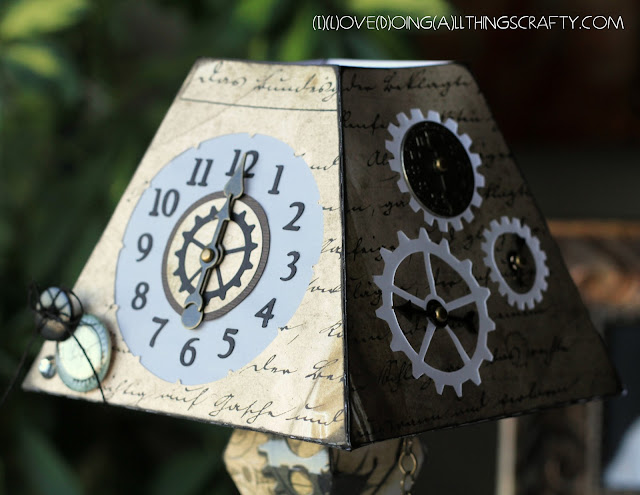
 Here is a closer look at the lampshade. I really wanted to make the clock functional but couldn't find a small enough clock movement kit for this project. I did find the next best thing... Tim Holtz's Idea-ology Time Pieces. His stuff is AWESOME!

Paper Clock Lamp | SVGCuts Challenge Entry

Side view of the lampshade and all the gears.

Paper Clock Lamp | SVGCuts Challenge Entry

Below is a close-up of the details on the base of the lamp.  Stamp comes from Stampendous Time Flies collection. I finished the pull cord chain with the cutest Flair button from Paper Play Studio, I thought "dreamer" was the perfect little touch for a lamp. 

Paper Clock Lamp | SVGCuts Challenge Entry

And my favorite part of the lamp is actually seeing it all lit up! Isn't it pretty?!? I think this is going to be the perfect Father's Day gift for my hubby! He collects watches, so I know he is gonna love this!

Paper Clock Lamp | SVGCuts Challenge Entry

Thanks for stopping by. I hope you've enjoyed my version of the lamp. If you're a paper crafter make sure you enter the challenge! It's really all about fun and pushing your creativity, and if you win something it's a bonus!

Happy Crafting :)
Thursday, May 9, 2013

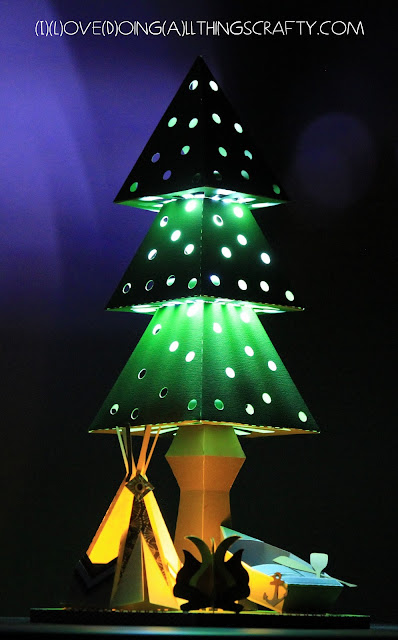
Pine Tree Paper Camping Scene Lamp and | Camp Lamp | SVGCuts


Hey Guys! SVG Cuts is having another Facebook Challenge, this time we are to create our version of the lamp from Maison de Madeline SVG Kit. Since we just ended the longest winter ever here in Edmonton, Summer has been on my mind... which led me to create this "Camp" lamp! 

This may be one of my favorite creations, love how it all came together! I'm always amazed at what paper and a little creativity can do!

Pine Tree Paper Camping Scene Lamp and | Camp Lamp | SVGCuts

Unfortunately, this project will NOT be entered into the Challenge as I got a bit ahead of myself. I got halfway through it only to realize that when I read the challenge rules a bit more closely, it did not qualify as I modified the lamp shape :( 

Oh, well... Lamp FAIL! I'm not too heartbroken though, my son fell in love with it as soon as he saw it... the only problem so did my daughter! I guess I may be making another one, lol! This would also make a great Father's Day gift for the Outdoorsy Man in your life!

Here is a closer look at the campground ;)
Isn't that Teepee the cutest thing ever? It's even functional too. Lift off the top and the base can be filled with little goodies!

Pine Tree Paper Camping Scene Lamp and | Camp Lamp | SVGCuts

Here is a birds-eye view from above...

Pine Tree Paper Camping Scene Lamp and | Camp Lamp | SVGCuts

My favorite part of all is when the tree is all lit up. Instead of using battery-operated tea lights, I used battery-operated LEDs, that I had purchased at the dollar store (the kinds you push down to light up a small closet). Since I used 3 of them, they actually do light up the room. I did use a tea light in the Teepee to give it a soft glow. I love the lit tree... reminds me of the sky at night. 

Pine Tree Paper Camping Scene Lamp and | Camp Lamp | SVGCuts

Recipe for Camp Lamp:

Lamp file comes from Maison de Madeline SVG Kit 
First I enlarged the whole lamp, then I created the middle and top shade slightly smaller than each other. Welded a triangle and tab to the top shade to create the point on the tree. Finally, I added the holes (circles) to the lampshade. (I didn't do this but, I would recommend you cut at least 2 or 3 pieces of the lampshade base for each tier. I think that would make the tree a little stronger)
The tree measures about 20 inches tall.
Teepee file and fire comes from Camp Smore SVG Kit
The Rowboat comes from Picnic in the Park SVG Kit
Modifications to the files done on the Silhouette DSE, all cut on the Silhouette Cameo.
For the base of my lamp, I used an unfinished wood picture frame (I need something strong and sturdy). Covered it up with cardstock and finished the edge with washi tape.


There you have it! The possibilities are endless... I'm sure I'll be making a few more of these trees for Christmas time... maybe even a Christmas scene! Oh, the wheels are turning... 


Well, onto my next project... SVG Cut Facebook Lamp Challenge... wait, didn't I do that already, he, he! Oh, oh, here we go again ;)

Thanks for coming by :)

Monday, May 6, 2013

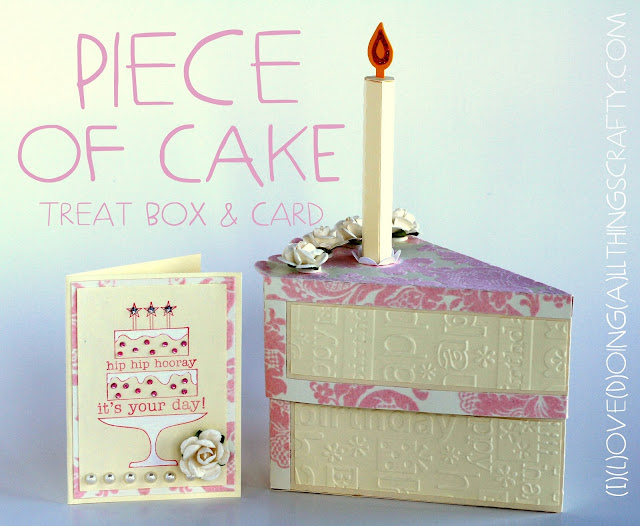
Piece of Cake Treat Box and Card | SVG Cuts

Today I want to share with you a little gift box  I made for one of my girlfriends. We've been friends since childhood... come to think of it, I was about my daughter's age when we first met... Over 30 years ago! Time flies Suzie... and yes we are on the slippery slope to 40! C'est la Vie, and what a wonderful life it is :)

Piece of Cake Treat Box and Card | SVG Cuts

Supplies:
File from SVG Cuts - B is for Birthday SVG Kit - Love this Kit!
Flocked Pattern paper from Anna Griffin's Valentina Collection
Ivory paper from Recollection
Cuttlebug
Happy Birthday Embossing folder
Stamp - Spotted Owl Soup Stamp Set from Unity Stamps
Cut on the Silhouette Cameo


Here is a closer look at the mini card I made! Tucks really nicely inside the box :)

Piece of Cake Treat Box and Card | SVG Cuts

I hope you like this "Piece of Cake" gift box. It really was a piece of cake to put together, lol! I'm sure I'll be making a few more of these! 

Thanks for coming by... Been a Slice!
Happy Crafting :)